Visualize Audio with Python – Waveform and Spectrograms
Turn sound into .png visuals and a clear .txt report – fully in your control.

Turn sound into .png visuals and a clear .txt report – fully in your control.
Within nova, we strip tools to their essence and rebuild them with intent.
Below you’ll find the full release – a polished, self-contained build for Windows, macOS, and Linux. If you just want to use it, download and run – everything’s bundled. Uses ffmpeg🔗.
Everything is free with no ads. Consider supporting unboundplanet.com.
Online, every guide that has this purpose is fragmented onto several places, kinda hard to build code without an AI to help and also waste time with trial-and-error.
Well, search no more, because in this article, we’ll build a complete, compact, open demo together: the same core analysis (waveform, spectrograms in linear/log, RMS, tempo) using Tkinter + librosa + matplotlib. It’s perfect for learning, tweaking, and extending.
What we’ll build in the article:
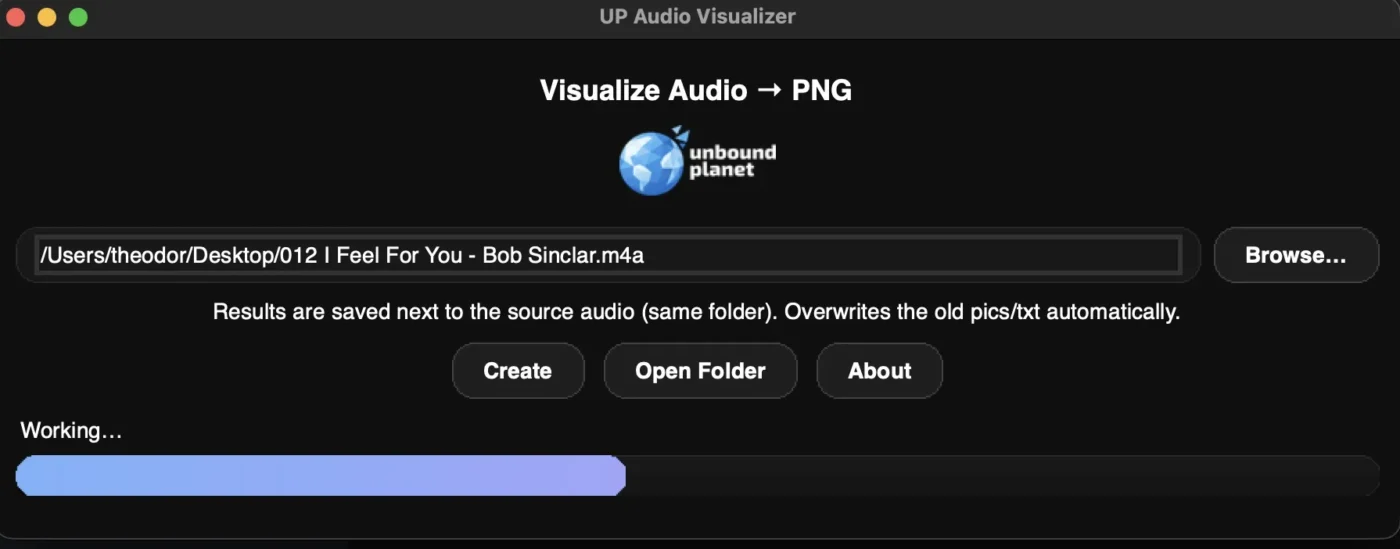
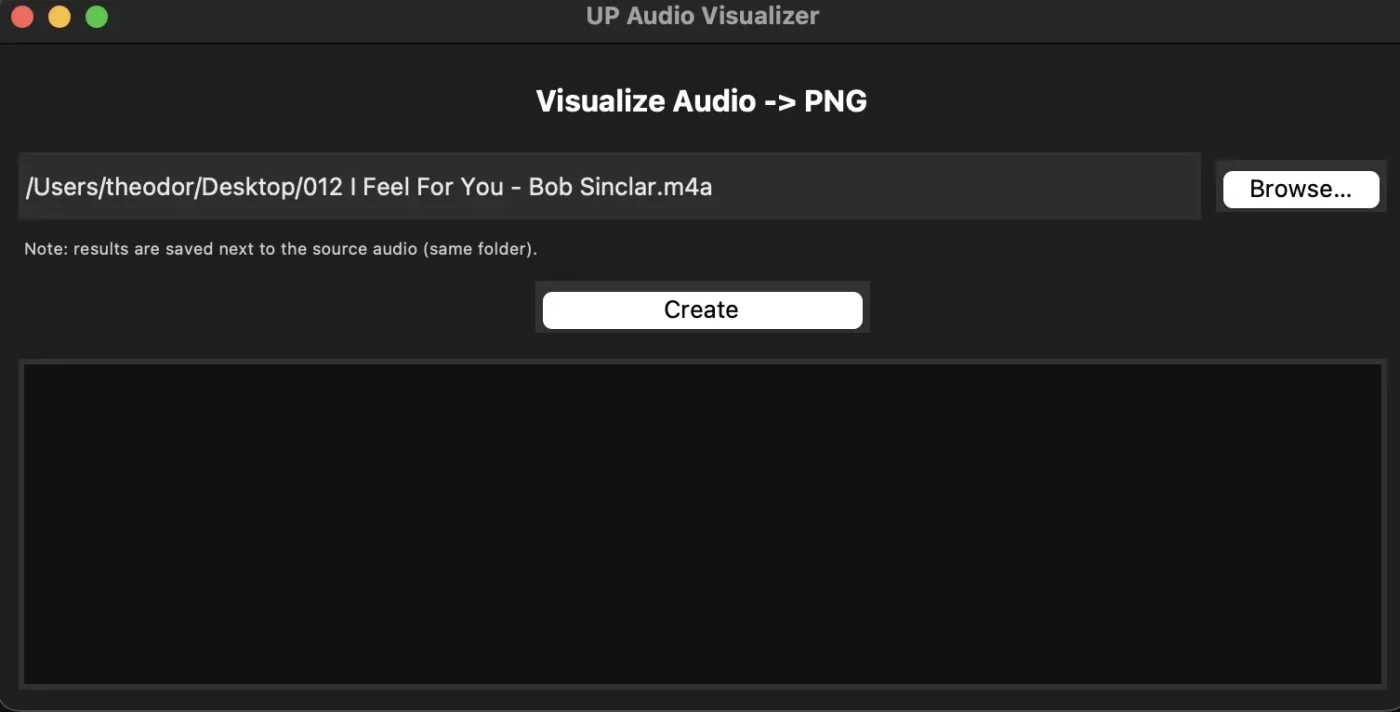
1. Browse – Create flow with a simple Tk UI
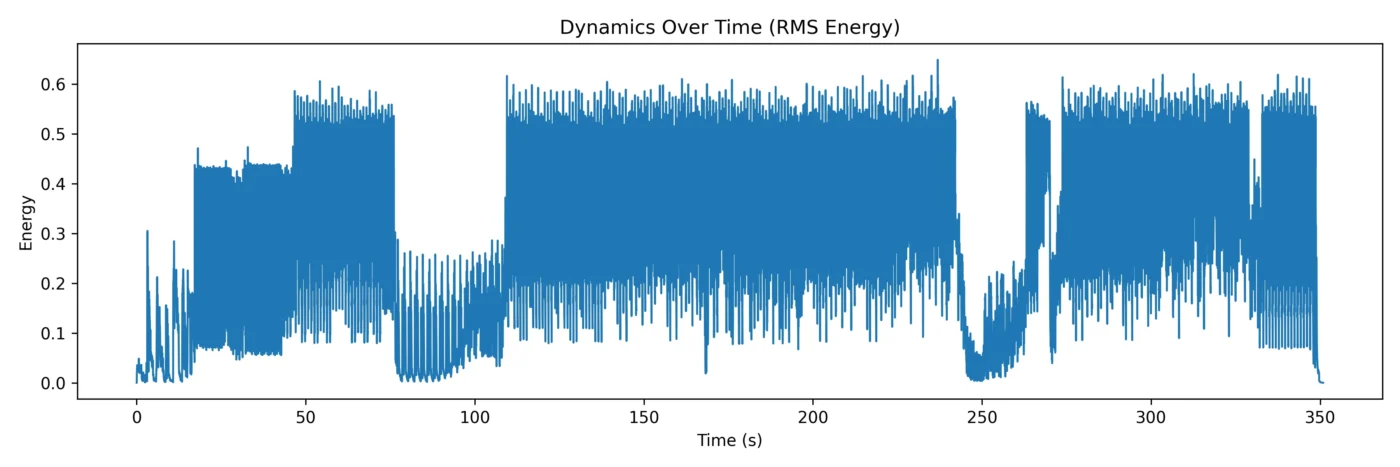
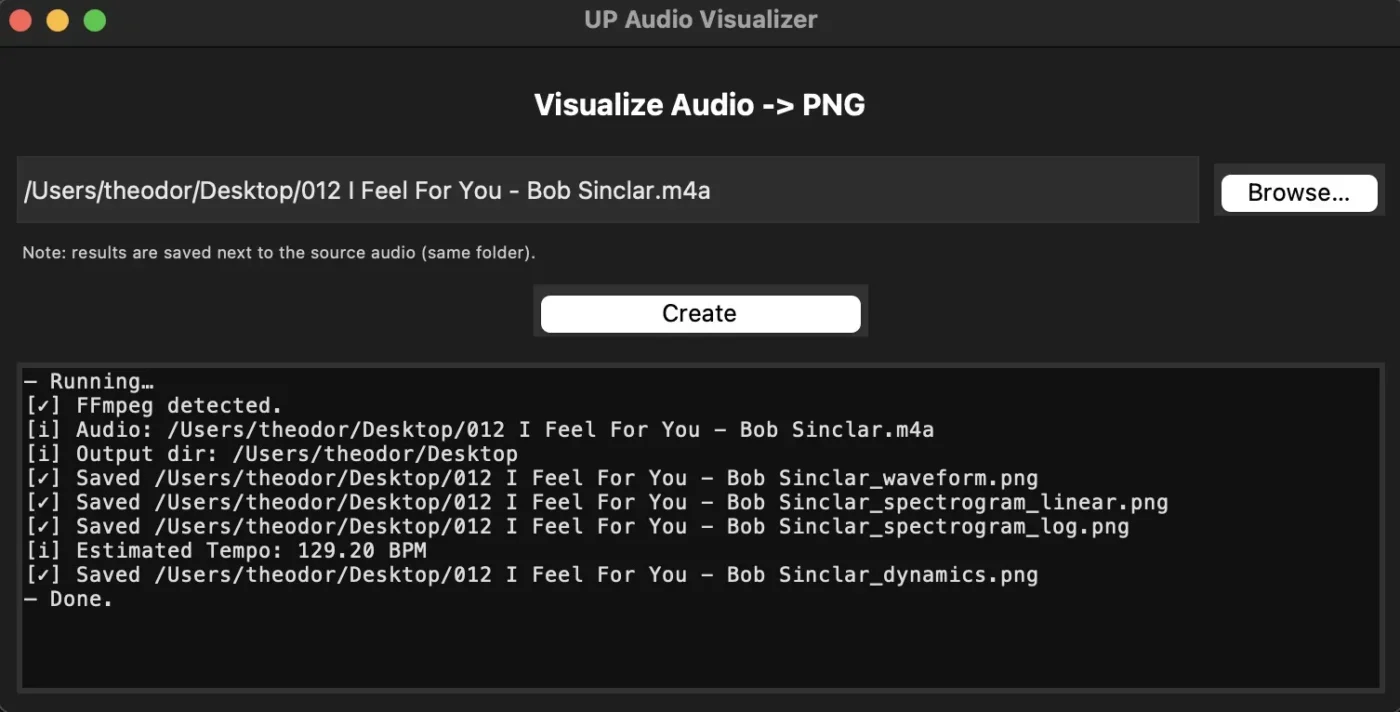
2. Waveform, Spectrogram (Linear Hz), Spectrogram (Log), RMS Dynamics (all at 300 DPI)
3. Tempo estimate and clean logging area
4. Small, readable code you can adapt to your needs
What’s in the full release (bundled above)
Everything from the demo plus:
5. FFmpeg/FFprobe discovery
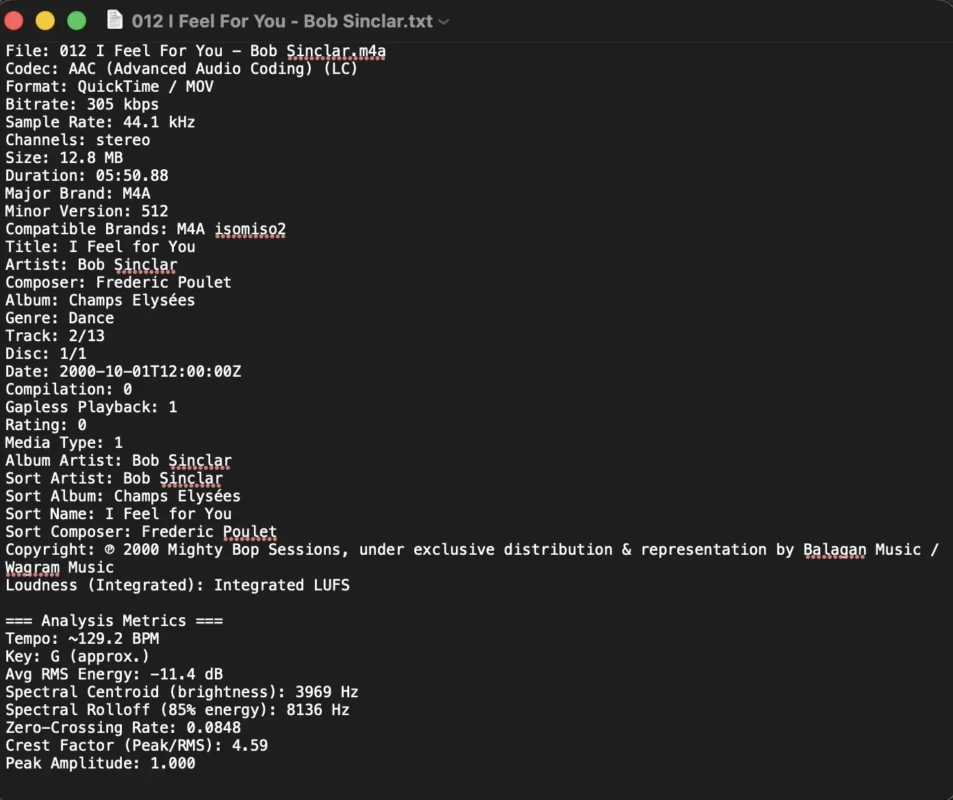
6. .txt report (codec, tags, duration, bitrate, channels, size, lyrics), plus LUFS via ebur128
7. Extra polish
Pick your path:
a) “I just want to use it.” – Download the full release above (Windows EXE, macOS DMG, Linux DEB).
b) “I want to understand it.” – Follow the tutorial and build the demo from scratch.
The demo runs locally with Python, FFmpeg, and two libraries: librosa and matplotlib. Pick your platform accordion.
– Windows 10/11 x64
– Python 3.10+ (includes Tk) – Download here🔗
– FFmpeg (ffmpeg + ffprobe) – Download here🔗
– Recommended: Visual Studio Code – Download here🔗
Don’t install Python yet, we gotta make sure we check some stuff.
Choose custom installation, tick the following: pip, tcl/tk and IDLE, Python test suite, then click Next.
IMPORTANT – Check “Add Python to environment variables” – this will give you Python in your Terminal app.
Open a cmd and type:python --version
If it prins something likePython 3.11.6you’re golden.
You now got Python running system-wide.
Copybin/ffmpeg.exeand bin/ffprobe.exeinto a project folder. Let’s keep things tidy from now on.
In cmd:
mkdir %USERPROFILE%\UPAV-demo
cd %USERPROFILE%\UPAV-demoThis is your working folder. Create a New Text Document, and rename it demo.py
(orwhatever-you-want.py).
This isolates your Python packages from the system, like a portable box.
python -m venv .venv
call .venv\Scripts\activate– After activation, your prompt changes to:(.venv) C:\Users\username\UPAV-demo >
– To exit later: typedeactivate
While in(.venv)mode, type:
python -m pip install -U pip
pip install "librosa>=0.10" "matplotlib>=3.8"While in(.venv)mode, type:
python -c "import tkinter; print('Tkinter OK')"
python -c "import librosa; print('Librosa OK')"
python -c "import matplotlib; print('Matplotlib OK')"
ffmpeg -versionIt should show version info (because the demo script adds the folder to PATH ifffmpeg.exeis sitting next to it).
That’s it! You can rollover to the next part.
– MacOS 12+ (Apple Silicon or Intel – Intel not tested)
– Python 3.10+ (includes Tk) – Download here🔗
– FFmpeg (ffmpeg + ffprobe) – Download here🔗
– librosa and matplotlib in a virtualenv (I’ll show you later how to)
– Recommended: Visual Studio Code – Download here🔗
Tip for later: Press ⌘ + Space, type Terminal, press Enter.
Install Python, defaults are fine.
After installation, open Terminal.
Type:python --version
If it prins something likePython 3.11.6you’re golden.
Place ffmpeg and ffprobe execs in a folder you’ll use for the project. If macOS later complains about running downloaded binaries, Control-click – Open once to approve.
You can also install ffmpeg systemwide by installing brew – Download here🔗
In a terminal, typebrew install ffmpeg.
This isolates your Python packages from the system, like a portable box. Right click the path and open a terminal inside the project folder, like this:
python -m pip install -U pip
pip install "librosa>=0.10" "matplotlib>=3.8"python -c "import tkinter; print('Tkinter OK')"
python -c "import librosa; print('Librosa OK')"
python -c "import matplotlib; print('Matplotlib OK')"
ffmpeg -versionIf the last line prints version info, FFmpeg is reachable (either side-by-side or via Homebrew). If not, ensure the binaries are next to your script or that Homebrew installed correctly.
That’s it for Mac. You’re ready for Part Two.
– Debian/Ubuntu (or derivative)
– Python 3.10+ (includes Tk) – Download here🔗
– FFmpeg (ffmpeg + ffprobe) – Download here🔗
– librosa and matplotlib in a virtualenv (I’ll show you later how to)
– Recommended: Visual Studio Code – Download here🔗
sudo apt update
sudo apt install -y python3 python3-venv python3-tk ffmpeg libsndfile1Thepython3-tklibrary gives Tkinter for the GUI.libsndfile1helps with uncompressed formats. FFmpeg is for MP3/OGG/M4A decoding.
mkdir -p ~/UPAV-demo
cd ~/UPAV-demoCreate a new text file (or .py via Visual Studio Code) here. If you prefer portable FFmpeg, you can also place ffmpeg and ffprobe execs here.
python3 -m venv .venv
source .venv/bin/activateYour prompt should now start with(.venv)
python -m pip install -U pip
pip install "librosa>=0.10" "matplotlib>=3.8"This pulls innumpy, scipy, audioread,etc.
python -c "import tkinter; print('Tkinter OK')"
python -c "import librosa; print('Librosa OK')"
python -c "import matplotlib; print('Matplotlib OK')"
ffmpeg -versionIf the last line prints FFmpeg version info, you’re golden (system package or side-by-side binaries). If not, confirm ffmpeg is installed or place the binaries next to your script.
Ok, now that we’re done with the prereqs, we can start having some fun. Openyour.pyfile in VS Code (or your editor of choice). Before we touch any buttons, let’s align on what we’re building and how the audio actually gets decoded.
1.1) A tiny history detour
– Sound waves: For centuries, people have tried to capture how strings and pipes vibrate, but the shape of sound as a function of time became practical once we could record air pressure (late 19th/early 20th century) = your waveform plot is that pressure, over time.
– Fourier’s big idea (1807 – 1822): this incredibly smart french bloke stated that any signal can be expressed as a sum of sinusoids – he basically opened the math doorway to frequencies.

First function: “Fourier Transform” takes your sound wave in time and breaks it into frequencies (notes, pitches).
The second function: “Inverse Fourier Transform” takes those frequencies and rebuilds the original sound wave.
That’s literally all libraries like NumPy/Librosa are doing under the hood.
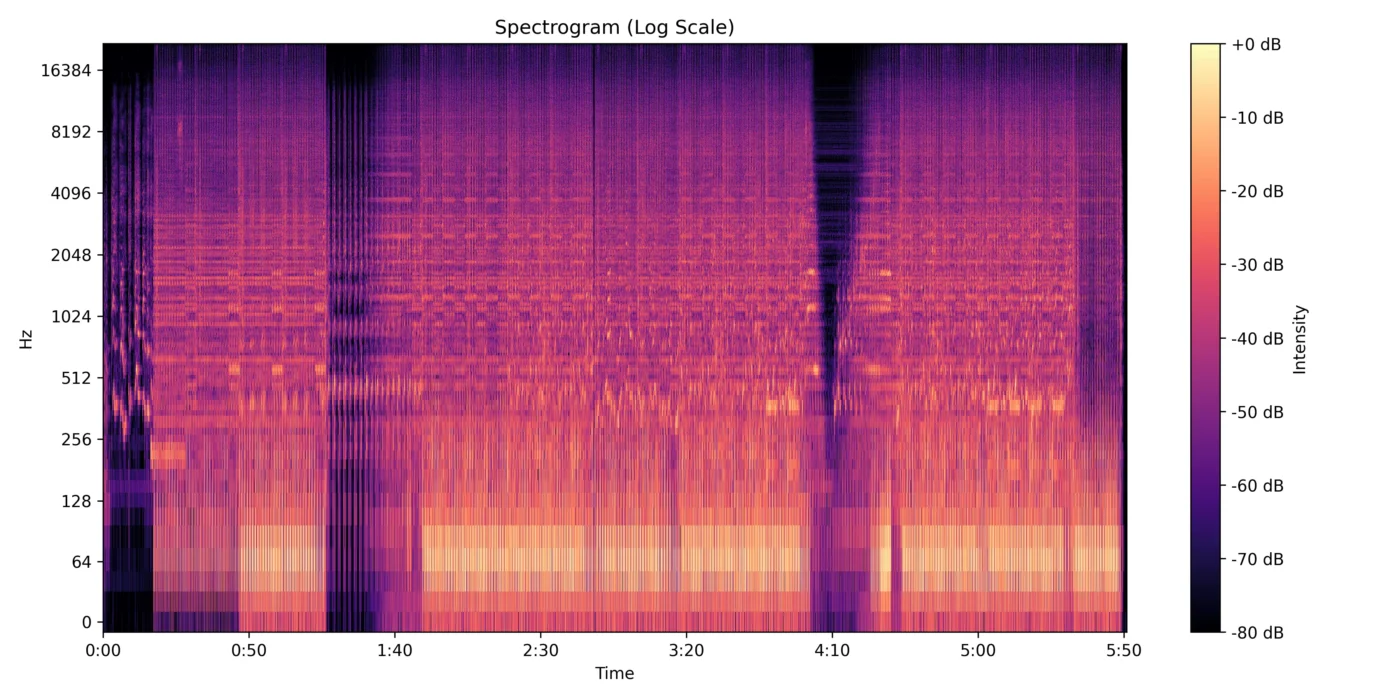
Spectrograms: Bell Labs popularized the sound spectrograph in the 1940s – “voiceprints” for speech and birdsong. Today we compute a short-time Fourier transform (STFT) slide-window, turn magnitudes to dB, and color them over time * frequency. The app results two spectrograms:
1. Linear Hz: literal frequency axis – good for high-frequency detail.
2. Log scale: compresses highs, expands lows – closer to how we hear.
Key vocabulary
– PCM (Pulse-Code Modulation): the audio as a list of numbers – samples of air pressure at evenly spaced times.
– Sample rate (sr): how many samples per second (e.g., 44,100). Higher sr = more detail in time; affects time and frequency resolution tradeoffs. We will use sr = None, no resampling, take the audio file as-is.
– y: a NumPy array of those samples. In this demo we use mono = True so y is 1-D (clean and fast). With stereo you’d get 2-D and choose/average channels.
– How does Python “know” where y and sr come from?
When you type this:
y, sr = librosa.load("song.mp3", sr=None, mono=True)<br />
Three things happen under the hood:
1. librosa looks at the file extension (.mp3, .wav, etc.) and decides which backend should decode it.
If it’s WAV/FLAC/AIFF = it uses libsndfile (via the soundfile library).
If it’s MP3/OGG/M4A = it asks audioread, which in turn uses FFmpeg to decode.
2. That backend spits out raw PCM:
Think of PCM as a giant list of numbers: air pressure snapshots, one after another. Example: [0.0, 0.01, 0.04, -0.02, -0.05, …].
3. librosa does two extra favors for us:
It normalizes all those numbers to fit neatly between -1.0 and +1.0 (float32). It also hands us the sample rate (sr), ex. 44100 – meaning 44,100 samples per second.
Why y and sr are all we need:
– y = the actual signal – a NumPy array we can plot, transform, measure.
– sr = the time ruler – tells us how far apart the samples are (1/44100s, 1/48000s, etc.).
Every graph we’ll draw (waveform, spectrograms, dynamics) is basically:
“Take y, line it up with sr, and re-visualize it in a clever way.”
1.2) The pseudocode
– Start app
– on Browse…, user picks an audio file
– ensure_ffmpeg()
– find ffmpeg/ffprobe next to script/app (and macOS …/Resources if packed)
– add that folder to PATH
– on POSIX (Mac & Linux), set exec bits if needed (chmod +x)
– version sanity check
– analyze(path)
– log what we’re doing
– librosa.load(path, sr=None, mono=true) – mono is cheaper, results are good enough
– if WAV/FLAC/AIFF – libsndfile (via soundfile)
– else (MP3/OGG/M4A/AAC) -> audioread -> ffmpeg -> PCM
– returns: y (samples), sr (sample rate)
– compute STFT – magnitude dB for spectrograms
– plot + save: waveform, spectrogram (linear Hz), spectrogram (log)
– compute tempo (beat track)
– compute & save RMS dynamics
– log saved paths
– UI: show logs, keep app responsive with a background thread
1.3) Codecrafting
Imports (the pit crew):
os, sys, stat, shutil, subprocess, threading, traceback, Path
Files, folders, permissions (exec bits), running small commands, background thread for the UI, readable error logs.
matplotlib.use(“Agg”)
Headless renderer-saves PNGs without popping a window or needing a desktop backend.
matplotlib.pyplot as plt, numpy as np
Plotting and fast number-crunching.
librosa, librosa.display
Audio I/O (decoding), analysis (STFT/tempo/RMS), and pretty helpers for plots.
tkinter, filedialog, messagebox
The tiny GUI: pick file, show status, pop an error if something goes boom.
UI labels and copy (the face):
APP_TITLE – Window title.
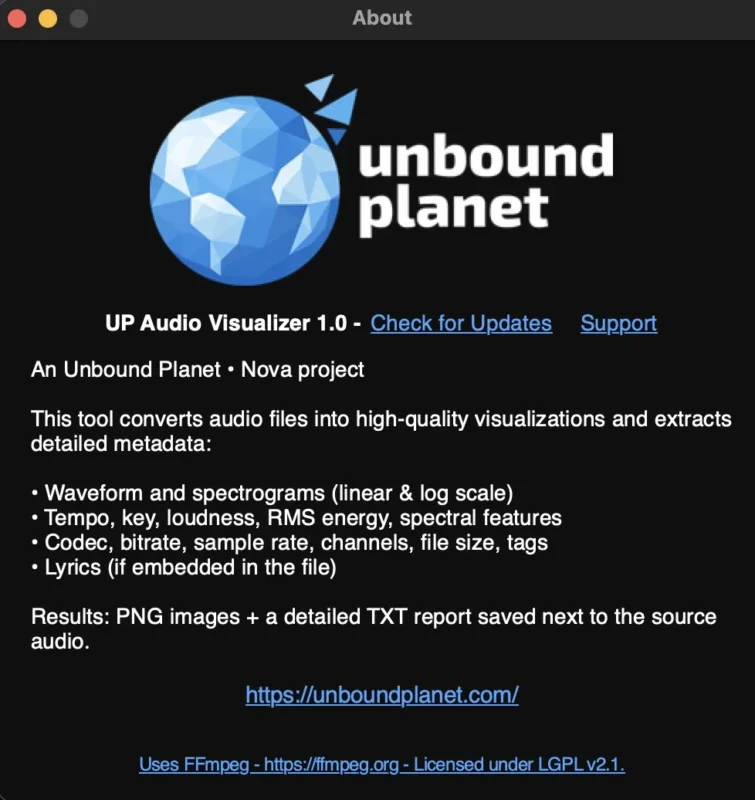
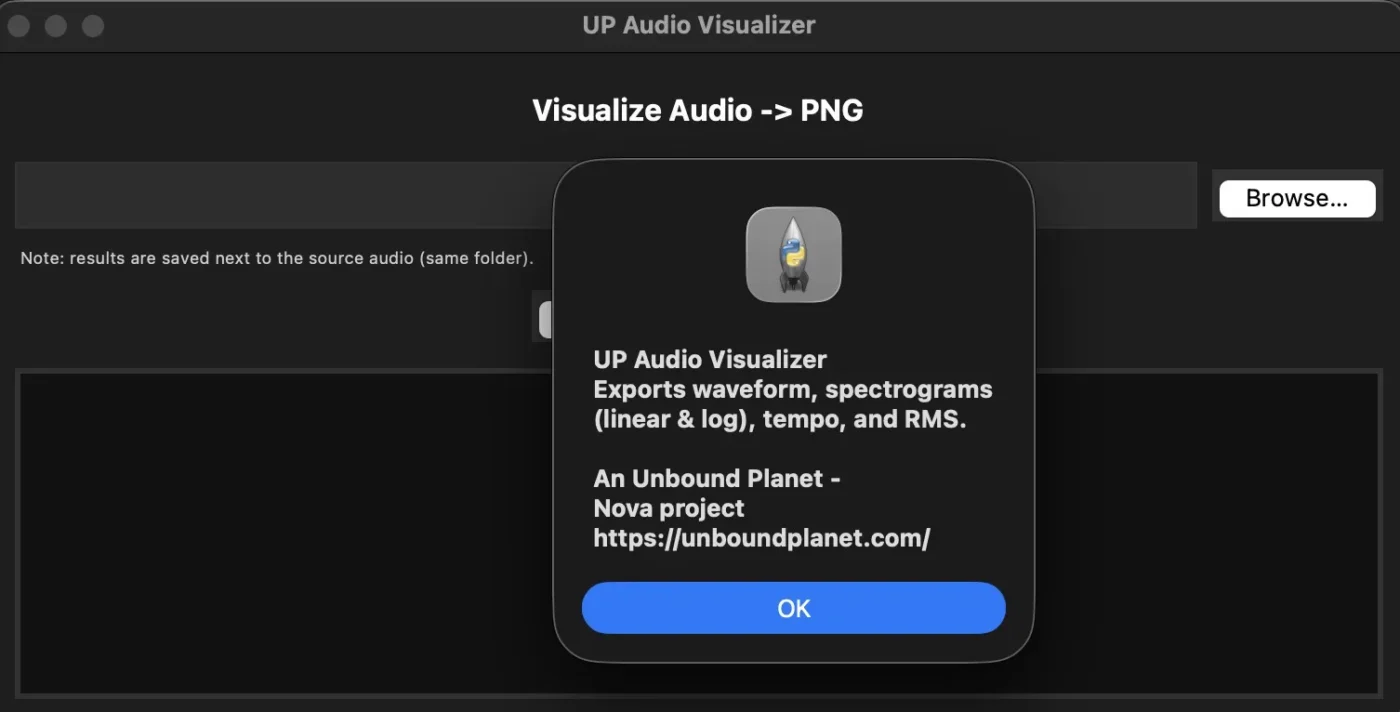
ABOUT_TEXT – the About dialog – what the app does and where it lives.
AUDIO_FILTERS – the file picker’s whitelist (WAV, FLAC, MP3, OGG, M4A, AAC, AIFF…).
That’s it for this part: you now know what gets decoded.
A beginner’s tip: CAREFUL with Python’s indentations, they are basically the {} brackets of C, or the begin and end of any function. Having the wrong indentation will break the code.
Start writing the initial part:
import os, sys, stat, shutil, subprocess, threading, traceback
from pathlib import Path
import matplotlib
matplotlib.use("Agg")
import matplotlib.pyplot as plt
import numpy as np
import librosa
import librosa.display
import tkinter as tk
from tkinter import filedialog, messagebox
APP_TITLE = "UP Audio Visualizer"
ABOUT_TEXT = (
"UP Audio Visualizer\n"
"Exports waveform, spectrograms (linear & log), tempo, and RMS.\n\n"
"An Unbound Planet • Nova project\n"
"https://unboundplanet.com/"
)
AUDIO_FILTERS = [
("Audio files", "*.wav *.flac *.mp3 *.ogg *.m4a *.aac *.aiff *.aif *.aifc"),
("All files", "*.*"),
]Reminders:
Compressed formats (MP3/OGG/M4A/AAC) only decode reliably when FFmpeg is reachable. This block teaches the tiny utility that:
What this buys you
3.1 Where’s “here”?
Current app folder:
– from source (.py location)
– inside Pyinstaller – the lib that transforms your .py into exec
– inside a MacOS .app
# ---------- FFmpeg discovery (for MP3/OGG/M4A via audioread) ----------
def _bundle_dir() -> Path:
if getattr(sys, "_MEIPASS", None): # PyInstaller onefile/onedir
return Path(sys._MEIPASS)
if getattr(sys, "frozen", False): # other freezers
return Path(sys.executable).resolve().parent
return Path(__file__).resolve().parent # running from sourceQuick stuff:
– _MEIPASS: Pyinstaller’s temp directory.
– sys.frozen: “Hey, I’m a frozen exe in time!”
– Fallback: source folder of the .py.
3.2 Make FFmpeg findable and executable
Function:
– builds candidate directories to search (current, parent, macOS /Resources)
– checks that both ffmpeg and ffprobe exist in the same place
– on POSIX (mac/linux) ensures they’re executable
– prepends that directory to PATH
– pings both with -version and logs that all is good.
def ensure_ffmpeg(log=print) -> bool:
"""Try to make ffmpeg/ffprobe available on PATH; return True if usable."""
IS_WIN = (os.name == "nt")
IS_MAC = (sys.platform == "darwin")
ffm = "ffmpeg.exe" if IS_WIN else "ffmpeg"
ffp = "ffprobe.exe" if IS_WIN else "ffprobe"
# candidate dirs: next to script/exe, its parent, macOS Resources
dirs = []
bd = _bundle_dir()
dirs += [bd, bd.parent]
if IS_MAC:
# .../MyApp.app/Contents/MacOS -> Resources is two levels up
dirs.append(bd.parent.parent / "Resources")
# if both binaries live in any candidate dir, prepend it to PATH
for d in dirs:
f1, f2 = d / ffm, d / ffp
if f1.exists() and f2.exists():
for p in (f1, f2):
try:
mode = os.stat(p).st_mode
if not (mode & stat.S_IXUSR):
os.chmod(p, mode | stat.S_IXUSR | stat.S_IXGRP | stat.S_IXOTH)
except Exception:
pass
os.environ["PATH"] = str(d) + os.pathsep + os.environ.get("PATH", "")
break
def _ok(cmd):
try:
subprocess.run([cmd, "-version"], stdout=subprocess.PIPE, stderr=subprocess.STDOUT, timeout=3)
return True
except Exception:
return False
has = _ok("ffmpeg") and _ok("ffprobe")
if has:
log("[✓] FFmpeg detected.")
else:
log("[!] FFmpeg not found; MP3/OGG/M4A decoding may fail. Install FFmpeg or place ffmpeg/ffprobe next to this script.")
return hasHuman stuff:
– Both tools matter: ffmpeg decodes; ffprobe powers metadata later.
– Prepending (not appending) means your local copy wins, even if the system has an older one.
– On macOS/Linux, downloaded binaries may lack the exec bit – this fixes it.
That’s it – your decoder path is now predictable and portable.
Next up, fun stuff: turn y + sr into the pictures (waveform and spectrograms) and log the tempo like pros.
Let’s do the analysis part. Copy-ready snippets included.
4.1 Resolve paths & name outputs
On POSIX, we expand ~. On everything, we resolve the file and precompute where the png plots will go and how they’ll be named:
# ---------- Analysis ----------
def analyze(audio_path: Path, log_cb=print):
# Ensure FFmpeg is reachable for compressed formats (safe to call always)
ensure_ffmpeg(log_cb)
audio_path = audio_path.expanduser().resolve(strict=True)
out_dir = audio_path.parent
out_prefix = audio_path.stem
def out(name: str) -> Path:
return out_dir / f"{out_prefix}_{name}.png"Quick stuff:
Predictable filenames (‘MySong_waveform.png’, etc.), saved next to the source.
4.2 Friendly logs + FFmpeg on
We tell the user what’s happening, then guarantee compressed formats decode the same on every machine.
log_cb(f"[i] Audio: {audio_path}")
log_cb(f"[i] Output dir: {out_dir}")4.3 Load audio (the only line you must trust)
librosa.load returns y (PCM samples) and sr (sample rate).
– sr = None – keep original, no resampling.
– mono = True – 1-D array, faster and cleaner for plotting. Changing to stereo is trivial if you want it.
# Load mono audio (librosa -> audioread -> ffmpeg for compressed)
y, sr = librosa.load(str(audio_path), sr=None, mono=True)4.4 Waveform (amplitude over time)
Single figure, tight layout, 300 DPI export.
# Waveform
plt.figure(figsize=(12, 4))
librosa.display.waveshow(y, sr=sr, alpha=0.85)
plt.title("Waveform")
plt.xlabel("Time (s)")
plt.ylabel("Amplitude")
plt.tight_layout()
wf_path = out("waveform")
plt.savefig(wf_path, dpi=300)
plt.close()
log_cb(f"[✓] Saved {wf_path}")4.5 Spectograms (time * frequency, in dB)
We do an STFT (short-time Fourier transform) with a 2048-sample window and 512-sample hop.
– Bigger n_fft = finer frequency detail, blurrier time.
– Smaller hop_length = more time detail, bigger files/plots.
Compute STFT + dB scale:
# Spectrograms
S = librosa.stft(y, n_fft=2048, hop_length=512, win_length=2048)
S_db = librosa.amplitude_to_db(np.abs(S), ref=np.max)Linear-Hz spectrogram (great for highs):
# Linear
plt.figure(figsize=(12, 6))
librosa.display.specshow(S_db, sr=sr, hop_length=512, x_axis="time", y_axis="hz", cmap="magma")
plt.colorbar(format="%+2.0f dB", label="Intensity")
plt.title("Spectrogram (Linear Hz)")
plt.tight_layout()
sp_lin_path = out("spectrogram_linear")
plt.savefig(sp_lin_path, dpi=300)
plt.close()
log_cb(f"[✓] Saved {sp_lin_path}")Log-frequency spectrogram (closer to hearing):
# Log
plt.figure(figsize=(12, 6))
librosa.display.specshow(S_db, sr=sr, hop_length=512, x_axis="time", y_axis="log", cmap="magma")
plt.colorbar(format="%+2.0f dB", label="Intensity")
plt.title("Spectrogram (Log Scale)")
plt.tight_layout()
sp_log_path = out("spectrogram_log")
plt.savefig(sp_log_path, dpi=300)
plt.close()
log_cb(f"[✓] Saved {sp_log_path}")4.6 Tempo (quick estimate)
We try beat tracking; if that path hiccups, we fall back to a simpler per-frame tempo estimate and take the first value. It’s an estimate, not a musicologist.
# Tempo
try:
tempo, _ = librosa.beat.beat_track(y=y, sr=sr)
tempo_scalar = float(tempo)
except Exception:
t_arr = librosa.beat.tempo(y=y, sr=sr, aggregate=None)
tempo_scalar = float(np.asarray(t_arr).ravel()[0])
log_cb(f"[i] Estimated Tempo: {tempo_scalar:.2f} BPM")Tips: Very sparse, ambient, or purely percussive signals can confuse tempo. Acceptable.
4.7 Dynamics (RMS over time)
RMS – perceived loudness trend. We compute frame-wise RMS, align a time axis, and plot it.
# Dynamics (RMS)
rms = librosa.feature.rms(y=y, frame_length=2048, hop_length=512)[0]
times = librosa.times_like(rms, sr=sr, hop_length=512)
plt.figure(figsize=(12, 4))
plt.plot(times, rms, linewidth=1.2)
plt.title("Dynamics Over Time (RMS Energy)")
plt.xlabel("Time (s)")
plt.ylabel("Energy")
plt.tight_layout()
dyn_path = out("dynamics")
plt.savefig(dyn_path, dpi=300)
plt.close()
log_cb(f"[✓] Saved {dyn_path}")That’s all folks! (with the analysis).
You: pick a file -> ensure_ffmpeg -> load -> plot & save -> tempo -> RMS.
The UI logs each step, and you get four 300-DPI images you can drop into docs or socials. Speaking of UI’s, let’s craft it now.
Goal: a tiny window that never freezes, one click analysis and clear logs.
5.1 Window skeleton (title, size, theme)
Creates the Tk root, sets a dark background, and calls our builders.
# ---------- UI ----------
class App(tk.Tk):
def __init__(self):
super().__init__()
self.title(APP_TITLE)
self.geometry("760x360")
self.configure(bg="#1e1e1e")
self._build_menu()
self._build_ui()
5.2 Help -> About (learn to make menus and dialogs)
Simple top-bar menu with a single About action.
def _build_menu(self):
m = tk.Menu(self)
helpm = tk.Menu(m, tearoff=0)
helpm.add_command(label="About", command=lambda: messagebox.showinfo("About", ABOUT_TEXT))
m.add_cascade(label="Help", menu=helpm)
self.config(menu=m)
5.3 File row (Entry + Browse…)
One line to show the chosen path and a button to pick files. Uses our AUDIO_FILTERS so the chooser only lists known formats.
def _build_ui(self):
pad = 12
title = tk.Label(
self,
text="Visualize Audio → PNG",
fg="#ffffff",
bg="#1e1e1e",
font=("Segoe UI", 16, "bold")
)
title.pack(pady=(18, 8))
row = tk.Frame(self, bg="#1e1e1e")
row.pack(fill="x", padx=pad, pady=(8, 4))
self.path_var = tk.StringVar()
entry = tk.Entry(
row,
textvariable=self.path_var,
bg="#2d2d2d",
fg="#e6e6e6",
insertbackground="#e6e6e6",
relief="flat",
highlightthickness=1
)
entry.pack(side="left", fill="x", expand=True, ipady=6)
def browse():
p = filedialog.askopenfilename(
title="Choose audio file",
filetypes=AUDIO_FILTERS,
initialdir=str(Path.home())
)
if p:
self.path_var.set(p)
btn = tk.Button(row, text="Browse...", command=browse)
btn.pack(side="left", padx=(8, 0))
Small note: the Entry lets advanced users paste paths or drag files into it (on many desktops).
5.4 Heads-up note + Create button
A tiny reminder that outputs live next to your source file, plus the main Create action.
note = tk.Label(
self,
text="Note: results are saved next to the source audio (same folder).",
fg="#cccccc",
bg="#1e1e1e",
font=("Segoe UI", 9)
)
note.pack(anchor="w", padx=pad, pady=(2, 10))
create = tk.Button(self, text="Create", command=self._on_create, width=16)
create.pack(pady=(0, 8))
5.5 Log panel (append-only console)
A simple Text widget acts as our console. We add one helper to append and auto-scroll.
self.log_box = tk.Text(
self,
height=10,
bg="#111111",
fg="#dcdcdc",
insertbackground="#dcdcdc",
relief="flat"
)
self.log_box.pack(fill="both", expand=True, padx=pad, pady=(6, 12))
def _log(self, msg: str):
self.log_box.insert("end", msg + "\n")
self.log_box.see("end")
self.update_idletasks()
def _log_async(self, msg: str):
self.after(0, lambda: self._log(msg))
5.6 Don’t freeze the window (background thread)
Heavy work runs outside the UI thread. We also guard against the empty path case and surface nice errors.
Tip: Tkinter isn’t thread-safe. Use self.after(…) to update UI from worker threads. Below is a safe pattern that tweaks your code slightly (adds _log_async and calls messageboxes via after).
def _on_create(self):
path = self.path_var.get().strip()
if not path:
messagebox.showwarning("Missing file", "Choose an audio file first.")
return
p = Path(path)
def worker():
try:
self._log_async("- Running...")
analyze(p, log_cb=self._log_async)
self._log_async("- Done.")
except Exception as e:
tb = "".join(traceback.format_exception(e))
def show_err():
self._log(f"! Error:\n{tb}")
messagebox.showerror("Error", str(e))
self.after(0, show_err)
threading.Thread(target=worker, daemon=True).start()
This pattern keeps all GUI work on the main thread while the analysis runs in the background.
5.7 Liftoff
At the very bottom of the file, we add:
if __name__ == "__main__":
App().mainloop()
Why this line exists:
In Python, files can be imported as modules or executed as scripts.
Theif __name__ == "__main__":check means: Only run this block if the file is launched directly (python demo.py).
If someone imports demo.py in another script, the GUI won’t suddenly pop up – only the functions and classes are imported.
That’s it! The demo is now a self-contained, cross-platform mini app, without looking up 4 different websites. Pick a file – create – watch plots and logs appear.
Goal: Don’t have time, gimme the full thing.
import os, sys, stat, shutil, subprocess, threading, traceback
from pathlib import Path
import matplotlib
matplotlib.use("Agg")
import matplotlib.pyplot as plt
import numpy as np
import librosa
import librosa.display
import tkinter as tk
from tkinter import filedialog, messagebox
APP_TITLE = "UP Audio Visualizer"
ABOUT_TEXT = (
"UP Audio Visualizer\n"
"Exports waveform, spectrograms (linear & log), tempo, and RMS.\n\n"
"An Unbound Planet - Nova project\n"
"https://unboundplanet.com/"
)
AUDIO_FILTERS = [
("Audio files", "*.wav *.flac *.mp3 *.ogg *.m4a *.aac *.aiff *.aif *.aifc"),
("All files", "*.*"),
]
# ---------- FFmpeg discovery (for MP3/OGG/M4A via audioread) ----------
def _bundle_dir() -> Path:
if getattr(sys, "_MEIPASS", None): # PyInstaller onefile/onedir
return Path(sys._MEIPASS)
if getattr(sys, "frozen", False): # other freezers
return Path(sys.executable).resolve().parent
return Path(__file__).resolve().parent # running from source
def ensure_ffmpeg(log=print) -> bool:
"""Try to make ffmpeg/ffprobe available on PATH; return True if usable."""
IS_WIN = (os.name == "nt")
IS_MAC = (sys.platform == "darwin")
ffm = "ffmpeg.exe" if IS_WIN else "ffmpeg"
ffp = "ffprobe.exe" if IS_WIN else "ffprobe"
# Candidate dirs: next to script/exe, its parent, macOS Resources
dirs = []
bd = _bundle_dir()
dirs += [bd, bd.parent]
if IS_MAC:
# .../MyApp.app/Contents/MacOS -> Resources is two levels up
dirs.append(bd.parent.parent / "Resources")
# If both binaries live in any candidate dir, prepend it to PATH
for d in dirs:
f1, f2 = d / ffm, d / ffp
if f1.exists() and f2.exists():
for p in (f1, f2):
try:
mode = os.stat(p).st_mode
if not (mode & stat.S_IXUSR):
os.chmod(p, mode | stat.S_IXUSR | stat.S_IXGRP | stat.S_IXOTH)
except Exception:
pass
os.environ["PATH"] = str(d) + os.pathsep + os.environ.get("PATH", "")
break
def _ok(cmd):
try:
subprocess.run([cmd, "-version"], stdout=subprocess.PIPE, stderr=subprocess.STDOUT, timeout=3)
return True
except Exception:
return False
has = _ok("ffmpeg") and _ok("ffprobe")
if has:
log("[✓] FFmpeg detected.")
else:
log("[!] FFmpeg not found; MP3/OGG/M4A decoding may fail. Install FFmpeg or place ffmpeg/ffprobe next to this script.")
return has
# ---------- Analysis ----------
def analyze(audio_path: Path, log_cb=print):
# Ensure FFmpeg is reachable for compressed formats (safe to call always)
ensure_ffmpeg(log_cb)
audio_path = audio_path.expanduser().resolve(strict=True)
out_dir = audio_path.parent
out_prefix = audio_path.stem
def out(name: str) -> Path:
return out_dir / f"{out_prefix}_{name}.png"
log_cb(f"[i] Audio: {audio_path}")
log_cb(f"[i] Output dir: {out_dir}")
# Load mono audio (librosa -> audioread -> ffmpeg for compressed)
y, sr = librosa.load(str(audio_path), sr=None, mono=True)
# Waveform
plt.figure(figsize=(12, 4))
librosa.display.waveshow(y, sr=sr, alpha=0.85)
plt.title("Waveform")
plt.xlabel("Time (s)")
plt.ylabel("Amplitude")
plt.tight_layout()
wf_path = out("waveform")
plt.savefig(wf_path, dpi=300)
plt.close()
log_cb(f"[✓] Saved {wf_path}")
# Spectrograms
S = librosa.stft(y, n_fft=2048, hop_length=512, win_length=2048)
S_db = librosa.amplitude_to_db(np.abs(S), ref=np.max)
# Linear
plt.figure(figsize=(12, 6))
librosa.display.specshow(S_db, sr=sr, hop_length=512, x_axis="time", y_axis="hz", cmap="magma")
plt.colorbar(format="%+2.0f dB", label="Intensity")
plt.title("Spectrogram (Linear Hz)")
plt.tight_layout()
sp_lin_path = out("spectrogram_linear")
plt.savefig(sp_lin_path, dpi=300)
plt.close()
log_cb(f"[✓] Saved {sp_lin_path}")
# Log
plt.figure(figsize=(12, 6))
librosa.display.specshow(S_db, sr=sr, hop_length=512, x_axis="time", y_axis="log", cmap="magma")
plt.colorbar(format="%+2.0f dB", label="Intensity")
plt.title("Spectrogram (Log Scale)")
plt.tight_layout()
sp_log_path = out("spectrogram_log")
plt.savefig(sp_log_path, dpi=300)
plt.close()
log_cb(f"[✓] Saved {sp_log_path}")
# Tempo
try:
tempo, _ = librosa.beat.beat_track(y=y, sr=sr)
tempo_scalar = float(tempo)
except Exception:
t_arr = librosa.beat.tempo(y=y, sr=sr, aggregate=None)
tempo_scalar = float(np.asarray(t_arr).ravel()[0])
log_cb(f"[i] Estimated Tempo: {tempo_scalar:.2f} BPM")
# Dynamics (RMS)
rms = librosa.feature.rms(y=y, frame_length=2048, hop_length=512)[0]
times = librosa.times_like(rms, sr=sr, hop_length=512)
plt.figure(figsize=(12, 4))
plt.plot(times, rms, linewidth=1.2)
plt.title("Dynamics Over Time (RMS Energy)")
plt.xlabel("Time (s)")
plt.ylabel("Energy")
plt.tight_layout()
dyn_path = out("dynamics")
plt.savefig(dyn_path, dpi=300)
plt.close()
log_cb(f"[✓] Saved {dyn_path}")
# ---------- UI ----------
class App(tk.Tk):
def __init__(self):
super().__init__()
self.title(APP_TITLE)
self.geometry("760x360")
self.configure(bg="#1e1e1e")
self._build_menu()
self._build_ui()
def _build_menu(self):
m = tk.Menu(self)
helpm = tk.Menu(m, tearoff=0)
helpm.add_command(label="About", command=lambda: messagebox.showinfo("About", ABOUT_TEXT))
m.add_cascade(label="Help", menu=helpm)
self.config(menu=m)
def _build_ui(self):
pad = 12
title = tk.Label(self, text="Visualize Audio -> PNG", fg="#ffffff", bg="#1e1e1e", font=("Segoe UI", 16, "bold"))
title.pack(pady=(18, 8))
row = tk.Frame(self, bg="#1e1e1e")
row.pack(fill="x", padx=pad, pady=(8, 4))
self.path_var = tk.StringVar()
entry = tk.Entry(row, textvariable=self.path_var, bg="#2d2d2d", fg="#e6e6e6", insertbackground="#e6e6e6", relief="flat", highlightthickness=1)
entry.pack(side="left", fill="x", expand=True, ipady=6)
def browse():
p = filedialog.askopenfilename(title="Choose audio file", filetypes=AUDIO_FILTERS, initialdir=str(Path.home()))
if p:
self.path_var.set(p)
btn = tk.Button(row, text="Browse...", command=browse)
btn.pack(side="left", padx=(8, 0))
note = tk.Label(self, text="Note: results are saved next to the source audio (same folder).", fg="#cccccc", bg="#1e1e1e", font=("Segoe UI", 9))
note.pack(anchor="w", padx=pad, pady=(2, 10))
create = tk.Button(self, text="Create", command=self._on_create, width=16)
create.pack(pady=(0, 8))
self.log_box = tk.Text(self, height=10, bg="#111111", fg="#dcdcdc", insertbackground="#dcdcdc", relief="flat")
self.log_box.pack(fill="both", expand=True, padx=pad, pady=(6, 12))
def _log(self, msg: str):
self.log_box.insert("end", msg + "\n")
self.log_box.see("end")
self.update_idletasks()
def _log_async(self, msg: str):
self.after(0, lambda: self._log(msg))
def _on_create(self):
path = self.path_var.get().strip()
if not path:
messagebox.showwarning("Missing file", "Choose an audio file first.")
return
p = Path(path)
def worker():
try:
self._log_async("- Running...")
analyze(p, log_cb=self._log_async)
self._log_async("- Done.")
except Exception as e:
tb = "".join(traceback.format_exception(e))
def show_err():
self._log(f"! Error:\n{tb}")
messagebox.showerror("Error", str(e))
self.after(0, show_err)
threading.Thread(target=worker, daemon=True).start()
if __name__ == "__main__":
App().mainloop()
That’s it! The demo is now a self-contained, cross-platform mini app, without looking up 4 different websites. Pick a file – create – watch plots and logs appear.
We’ve delivered a clean path to visualize your audio. You now have a fast, dependable audio analysis tool. On nova, we strive for fewer moving parts and even fewer surprises. Thanks for reading – you’re awesome.
Of course, much more stuff is coming soon, so:
Stay tuned right here, on Unbound Planet, with your favorite host.
–Theo
Contact me🔗 for suggestions, feedback, ideas.

