

The Cleanest Windows 11 Install Guide (25H2) – Debloated, Secure, AtlasOS v0.5
time has come. take control of your system again.
time has come. take control of your system again.
Here, within nova, we strip things back to the core and build them back up as we see fit.
I’ve always had this boomer mindset that you only own a product when you have full control of its dials and nudges.
It’s time to take flight into the world of Windows systems – a world we’re so accustomed with, yet more and more disconnected as time passes.
Get a Windows .iso installation.
Always get it from Microsoft.
Never get a prebuilt Windows .iso from any other websites.
Here’s the official Microsoft link🔗
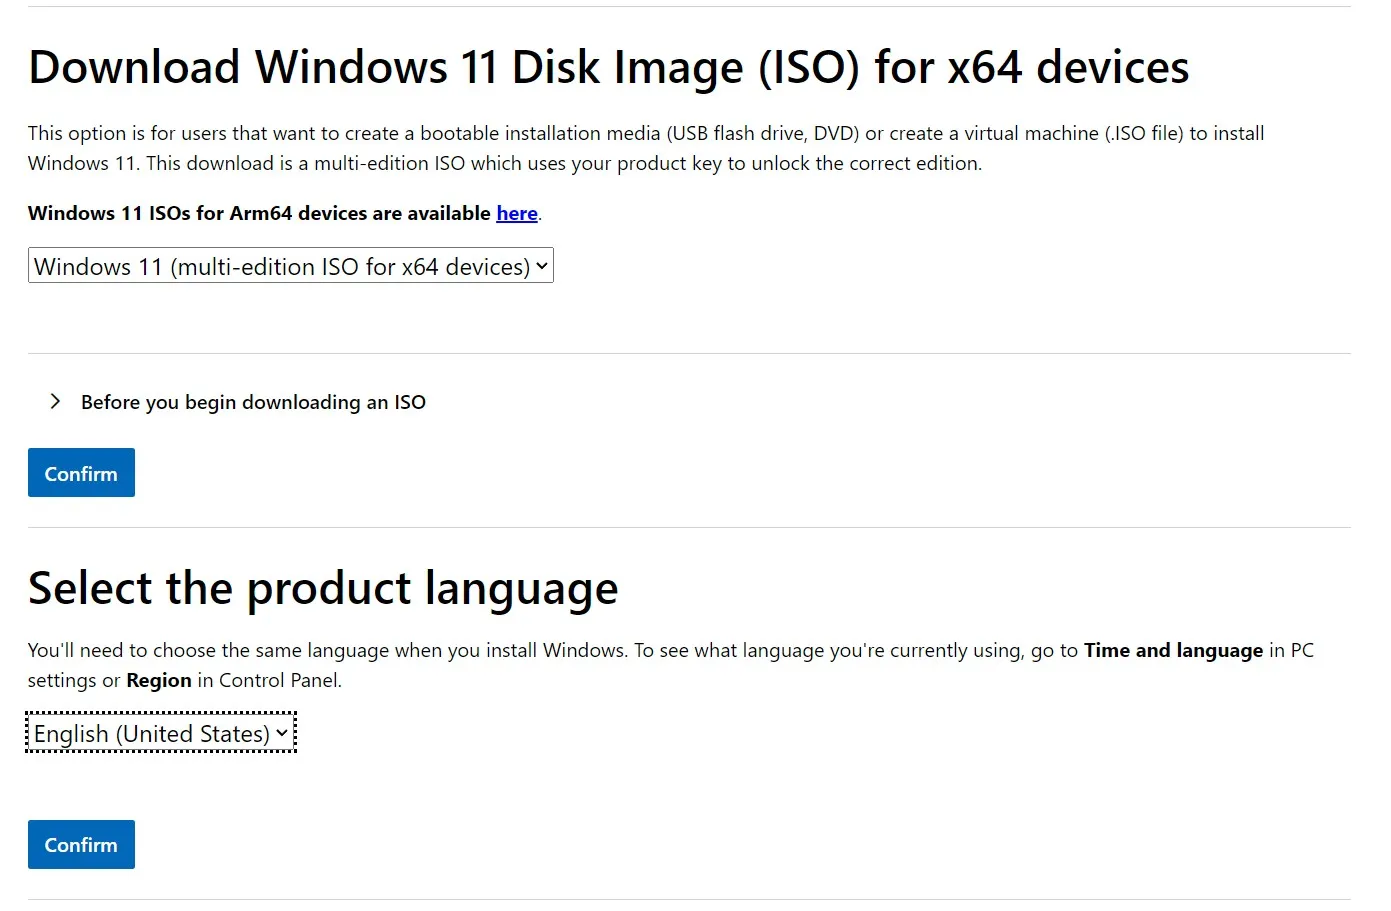
1.1) Ignore the Installation Assistant and Create Windows 11 Installation Media options
Go straight to the Download Windows 11 Disk Image (ISO) for x64 devices, as seen in the screenshot below. If your device is ARM, and not x64, the process is the same.
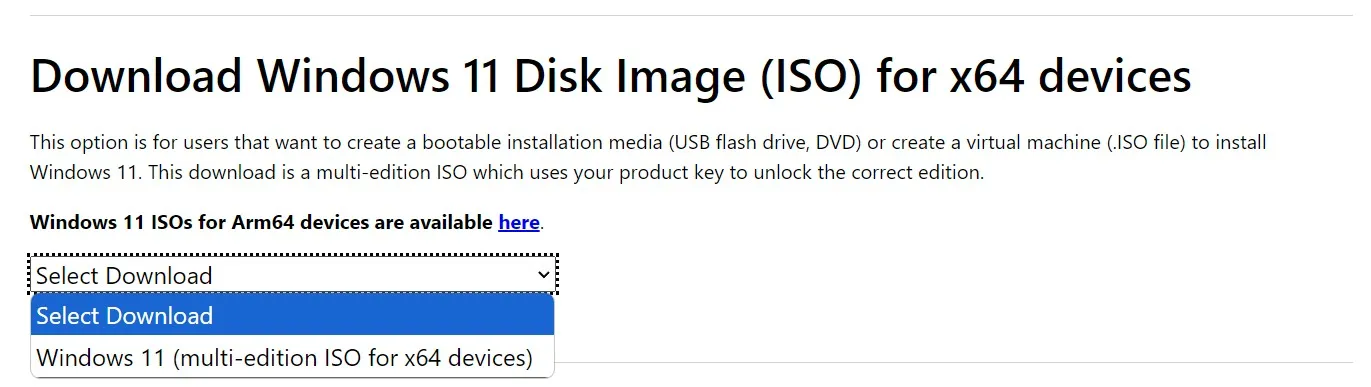
Screenshot: Microsoft’s slightly confusing .iso download section
1.2) Confirm
After your request is validated, choose your product language. For this guide, we’ll go with English (United States), but you can choose any language. After confirming again, you can click the 64-bit Download to get your official Win11_25H2_English_x64.iso installation file.
Screenshot: Microsoft’s slightly confusing .iso download section (2)
1.3) While it downloads
Go get yourself a drink, listen to this amazing tune, or jump straight to the next step.
2.1) Get Rufus, the portable version, here🔗
(portable is always better, keep your PC tidy, always). Rufus is the tool that basically copies Windows onto the USB disk and makes it seen by your motherboard.
Now, you have your .iso somewhere locally, and Rufus on your screen. It looks something like this→
2.2) Rufus config. We’ll go through each of these steps together:
– Device: Carefully select the USB Drive (in my case F:). The USB device will be wiped, so anything you’ve had before on it, it will be gone once you start the process (use a new one, or one dedicated for OS installations).
– Boot selection: click on SELECT – point it to the MS .iso
– Image option: Standard Windows installation
– Partition scheme: GPT (MBR is for old hardware – pre 2010).
– Target system: automatically changes whether you chose GPT or MBR.
– Hide advanced device properties – don’t check any of them.
– Volume label: Whatever you want
– File system: NTFS. Cluster size: the default variant.
– Check quick format and create extended label and icon files.
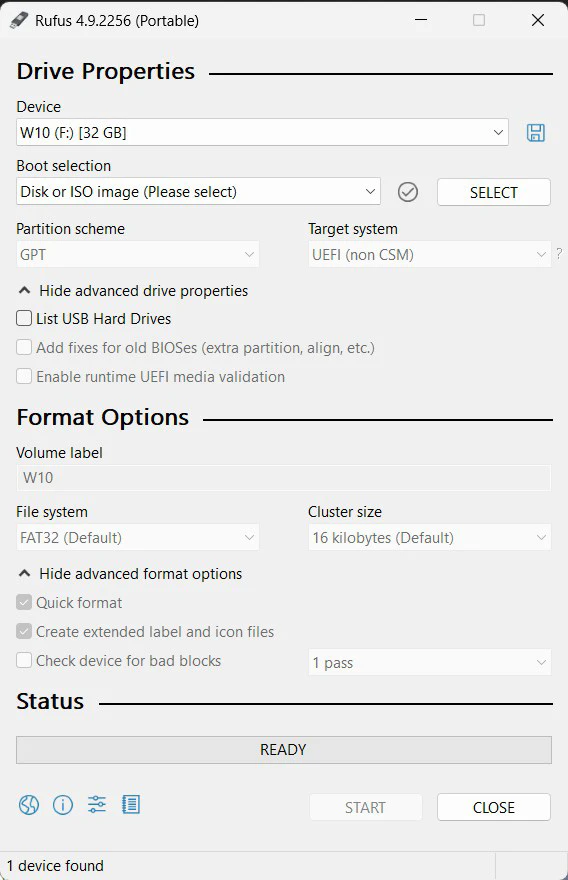
Screenshot: Rufus’ UI
2.3) When you’ll click start (do it now), you will get the “gotcha windows” screen, as I like to call it. Implemented by Rufus since Windows 11 launched – it gives us some options to play with:
– If you’re on older hardware (like a 7th-gen Intel Core i7-7700K, or a first-gen Ryzen 1600, or before those), check the first box “Remove requirement for 4GB+ RAM, Secure Boot and TPM 2.0.”
– Check “Remove requirement for an online Microsoft account”. It’s the first step to debloat heaven.
– Uncheck “Create a local account with username:”
– Uncheck “Set regional options to the same values as this user’s”
– Check “Disable data collection (Skip privacy questions)” – just the tip of the iceberg.
– BitLocker – I suggest checking Disable BitLocker automatic device encryption. BitLocker won’t keep your computer from getting infected with malware, it’s just a disk encryption feature that protects your data if the drive is lost or stolen – which you can make sure it won’t happen. This option prevents Windows from silently encrypting your drive and tying the recovery key to a Microsoft Account (which if we’ll allow, it might force us to manually save the recovery key – messy, unneeded). If you want BitLocker encryption, you can always enable BitLocker manually, in Windows, after we’ve installed everything.
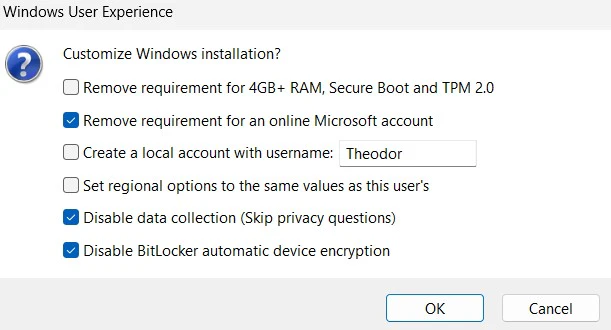
Screenshot: Rufus’ UI
2.4) Finally, click on OK.
The USB device will be wiped – it will give you another prompt warning about this, click OK when you’re ready. Let it finish up. Take another brake, you’ve earned it.
Alas… gone are the days where you had to hunt around your house for the sound card driver CD, but Windows still won’t always cover everything out of the box.
Now that we have the bootable drive ready, the free space it has left is good for storing drivers and apps.
3.1) First, get 7-zip from here🔗
Get the 64-bit variant. We’ll need it to unarchive weirdly packed drivers by the various vendors. Whether you’re doing this on a brand new machine or your current rig, knowing what model number to search for is really easy.
3.2) Finding your device model name
– Laptop – the exact model number is usually printed on a label under the chassis or on the box it came in.
– Desktop (prebuilt) – look at the case label (often on the back or side), or the invoice/box.
– Custom desktop – the box your motherboard came in will have the model, or it’s printed directly on the board itself (near the PCIe slots or RAM slots).
– Your current Microsoft-bloated PC: just press Win ⊞ + Rand typedxdiag– it’s the directx diagnostic tool – and hit Enter. You will see the System Model and the Manufacturer, exactly what you need.
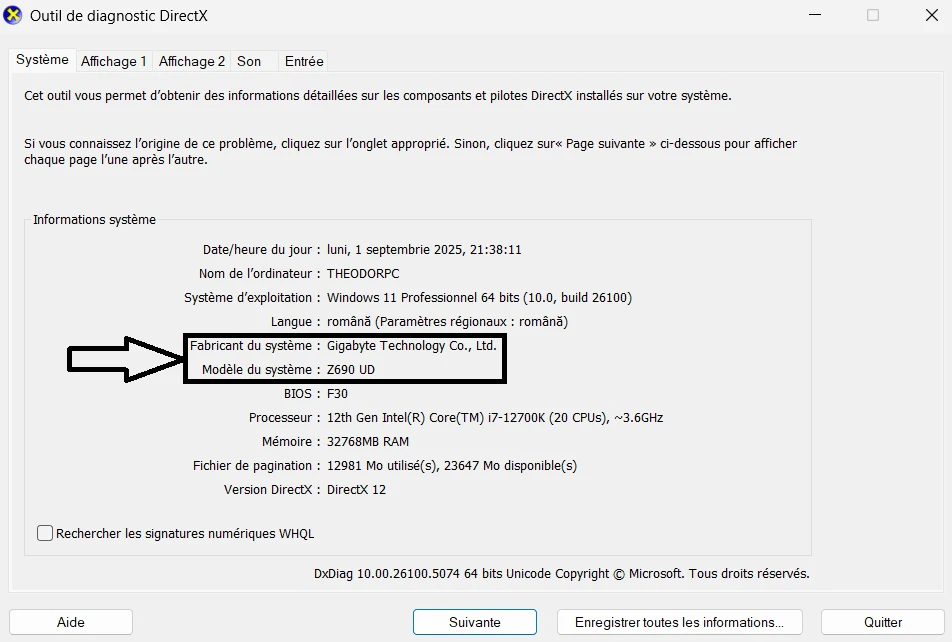
Screenshot: dxdiag’s welcome screen (yep, still trying to learn croissant).
3.3) Get the essentials
Search for the model online, access the official manufacturer’s website. Enter the Downloads / Support – Software section, and download:
– Storage (Critical – rare but a true blocker)
Some OEM laptops (Lenovo, HP, Dell) ship with SSDs that need a controller/firmware driver:
Symptom: Windows Setup doesn’t show any drives.
Fix: Copy the manufacturer’s NVMe + Intel RST + RAID driver to the USB. We’ll load it from Setup when prompted.
– Network
Many laptops or motherboards still don’t have the network driver included in the basic Windows driver set. Per case, copy the Ethernet + the Wi-fi driver to the USB. (sometimes the wi-fi driver is in a wi-fi+bluetooth combo. Also some laptop manufacturers ship laptops with different wi-fi boards – Realtek/Intel/Atheros etc. If this is the case, download all of them.).
– Chipset (Intel/AMD/Snapdragon)
Eliminates a ton of weirdness. Windows will install its own, but it’s better to have the latest from the manufacturer.
Here’s where keyboards get smashed and foreheads get slapped. Turn off your PC normally, via Shut Down or, if it’s a new device, leave your other PC and go to the new one.
Insert the Installation USB Disk we’ve just created, if it wasn’t in already. 😮💨
4.1) Start your PC and wait a bit.
If nothing happened, or it’s your current PC and the system starts normally into your usual Windows, it means the motherboard didn’t pick up the Installation drive. Before shutting it down again – take note of the BIOS key for your device. PCs have it easy – 95% it’s the DEL key.
For the others, I have a little reference here:
Gigabyte/ASUS/MSI: DEL for setup; F12/F11 for boot menu.
Dell/Lenovo: F12.
HP: Esc/F9.
Acer: F12.
Now, when starting, mash the DEL (or equivalent manufacturer BIOS key) until you enter UEFI Setup (or BIOS, as we’ve grown accustomed to).
Here are the settings of your motherboard. They are applied even if no Windows is installed. Don’t try to understand them all – I’m positive that even the manufacturers don’t know what all the knobs do.
Note: most of motherboards have a dedicated “Boot key” but we’ll use good old clear route.
Focus on finding the Boot menu or Boot priority, or just “Boot”. Here’s how it looks on my Gigabyte Z690UD board:
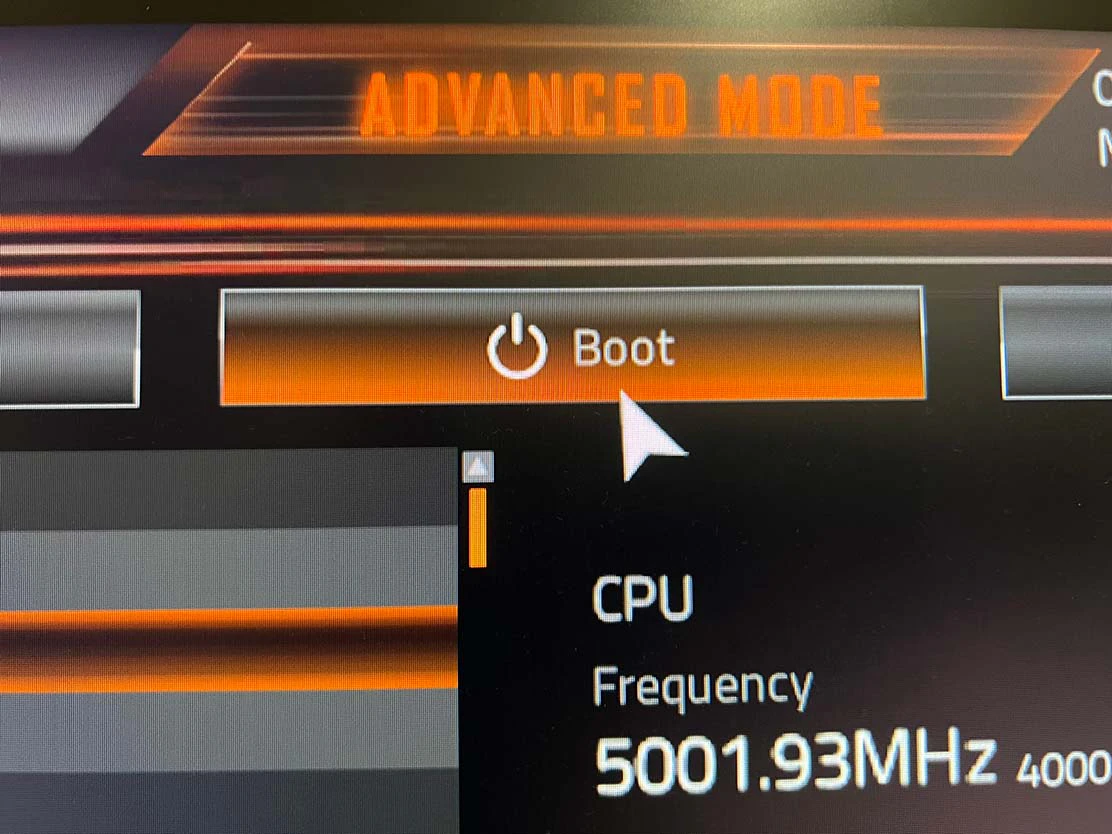
Photo: Boot menu on a Gigabyte Z690UD
4.2) Setting the boot priorities
You’ll find a boot option priority setting. Make sure our USB installation drive is visible, and place it as the first option. Partition 1, always – Partition 2 is a FAT32 made just to address some UEFI stuff.
(Pick the large NTFS “Partition 1”.)
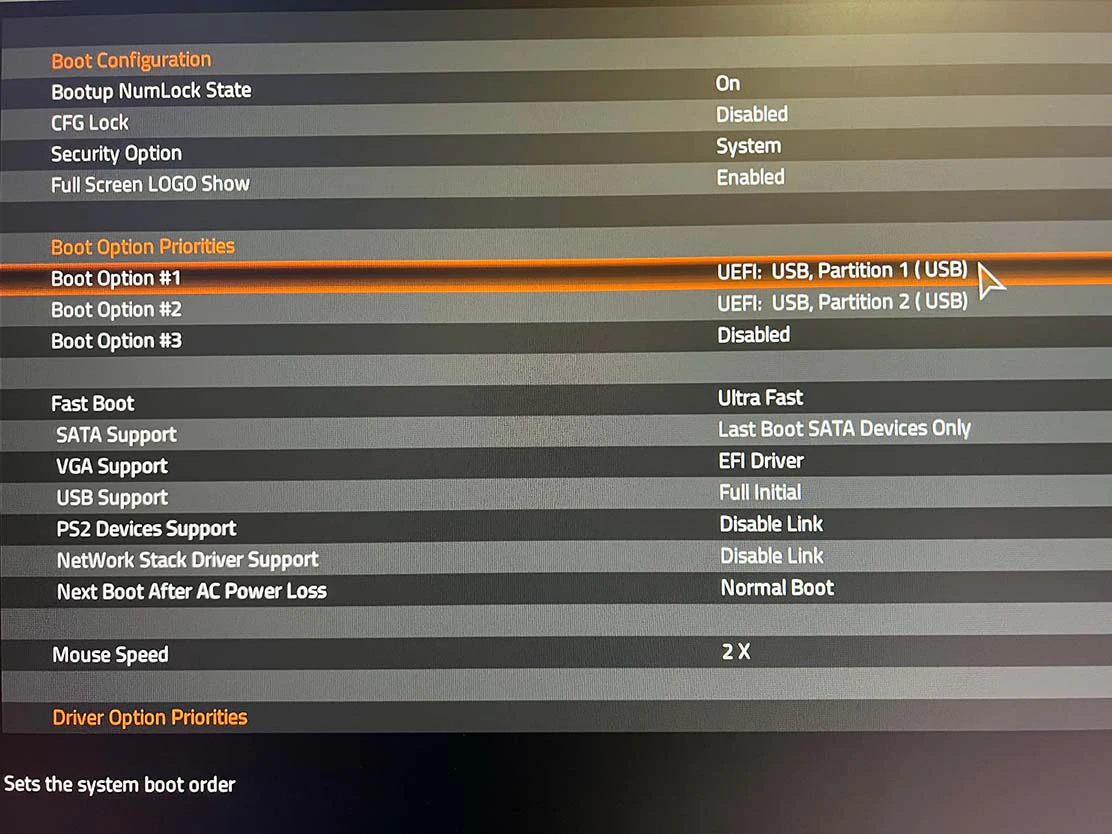
Photo: Boot menu on a Gigabyte Z690UD (2)
4.3) Troubleshooting
If you don’t see the USB Drive here:
– Try plugging it in a different port, then turn the pc off → on → mash key → enter boot options again. If it still doesn’t appear or doesn’t boot you have two more options (that will require remaking the Rufus USB drive):
1. Remake the Rufus USB Drive as FAT32 instead of NTFS. Some firmwares just won’t boot NTFS install media.
2. (not recommended, but worth trying) Disable Secure Boot in BIOS (Boot or Security menu) – this will require remaking the USB with rufus and checking the first box “Remove requirement for 4GB+ RAM, Secure Boot and TPM 2.0.”
If it still doesn’t show up, contact me, we’ll sort it out.
4.4) Success
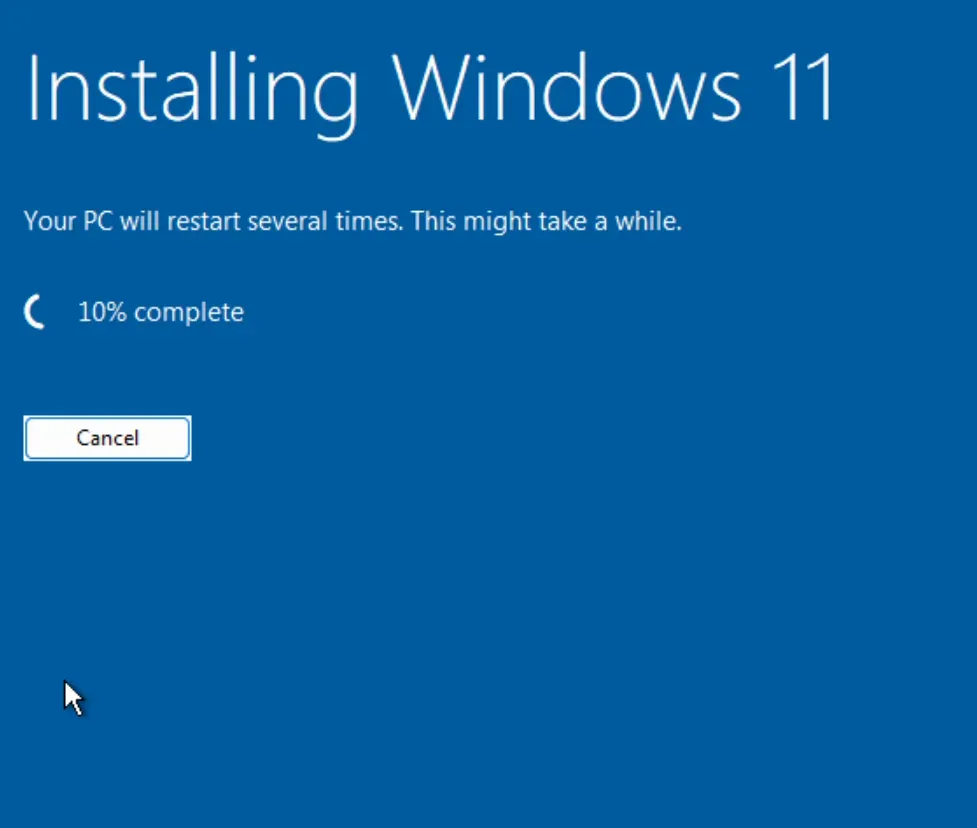
If you see the spinning windows thingy and instead of going into your old windows, it shows this→
Screenshot: Windows first setup screen.
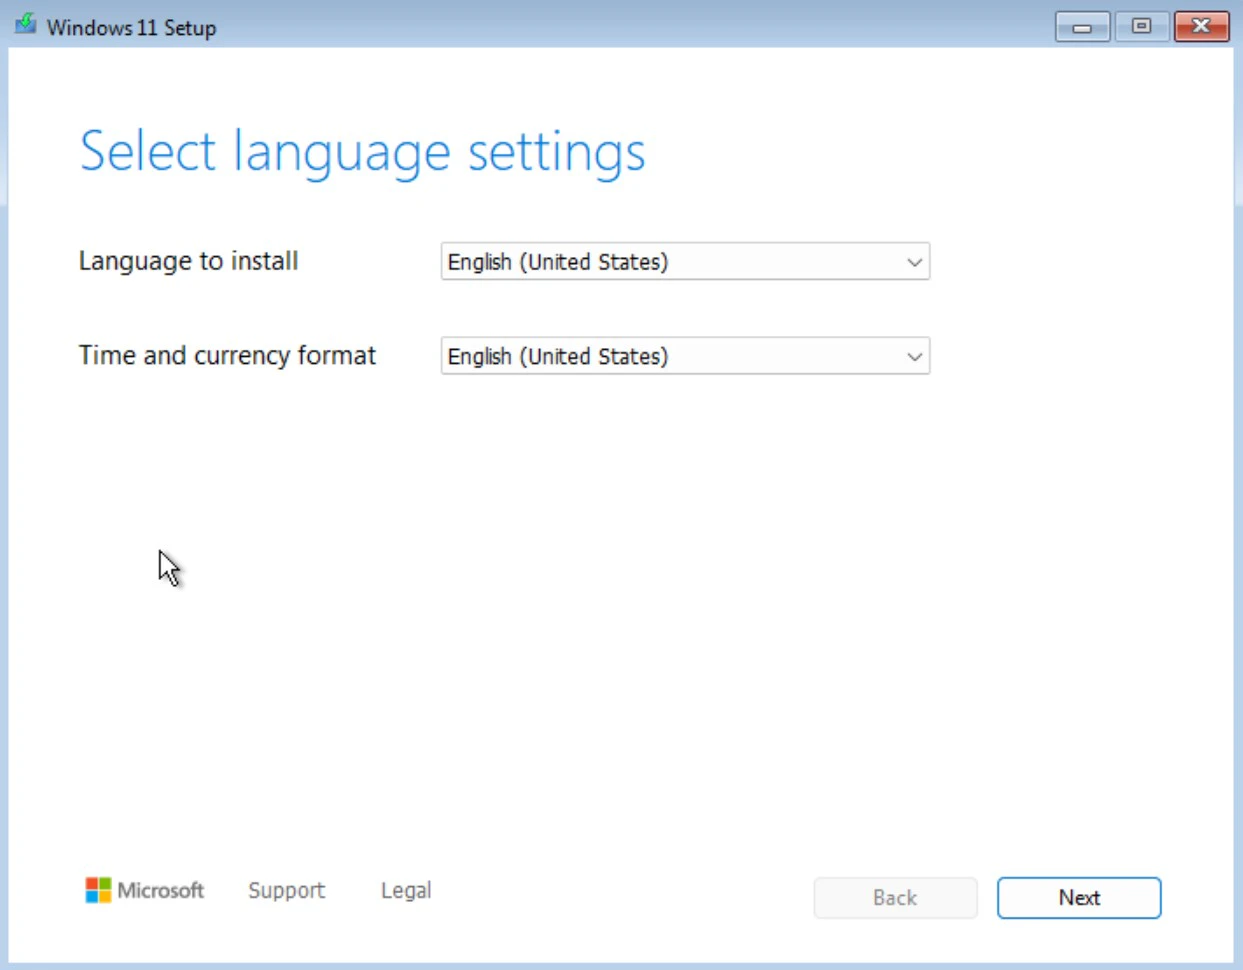
5.1) Brace yourself
Set your language and your keyboard (applied just for the rest of the installation).
Stop when you reach this screen:
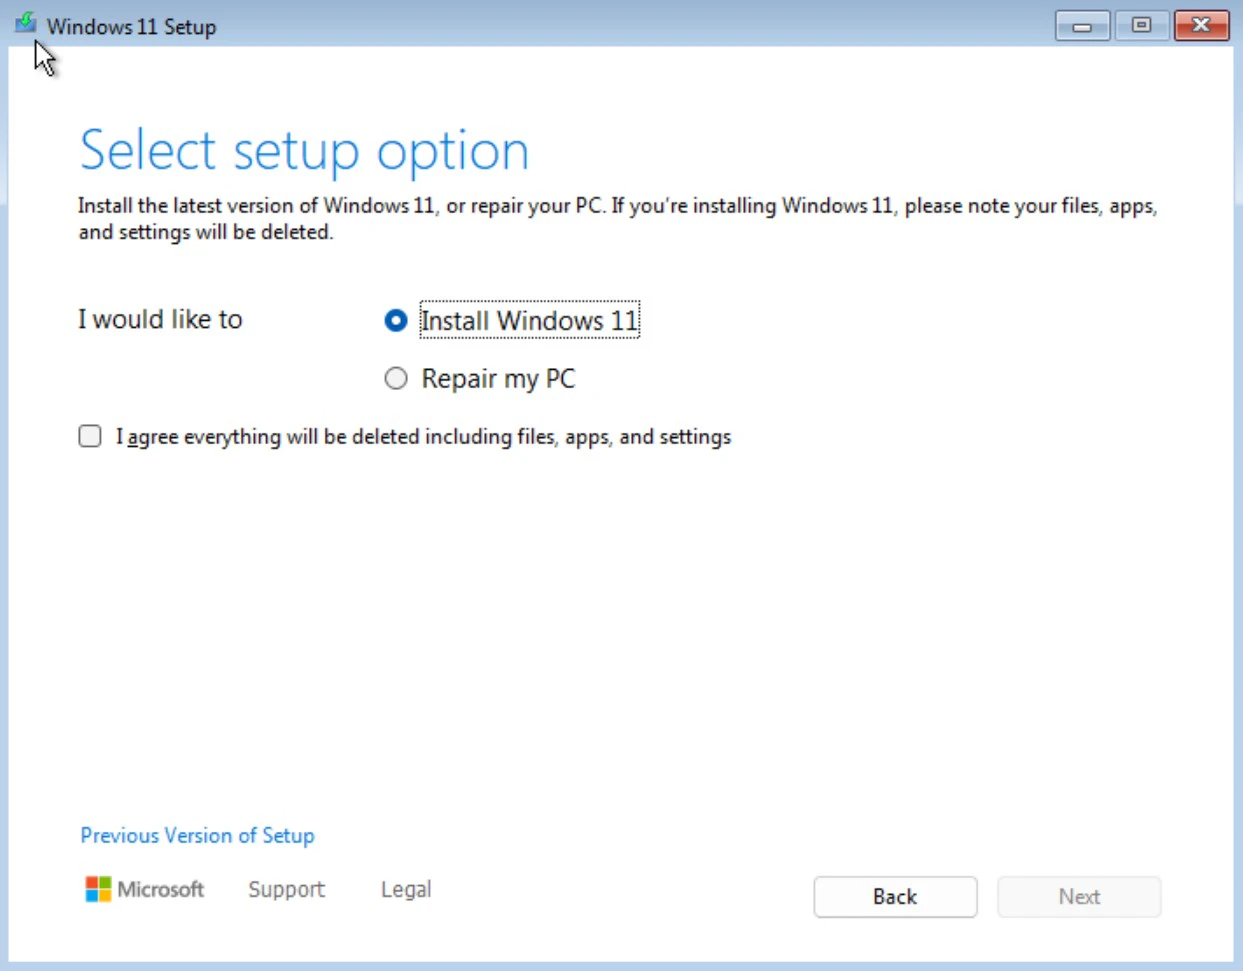
Screenshot: Installing Windows 11 using this method will wipe everything from the device.
5.2) Product key
If you have a product key, you may enter it now. If you don’t, but your device came with Windows preinstalled, hit “I don’t have a product key”. Once install finishes, the key will be installed automatically.
5.3) Always a Pro
Select image: Select Windows 11 Pro (not Pro N, not Pro education/workstation, etc.) and click next. Read & Accept the license.
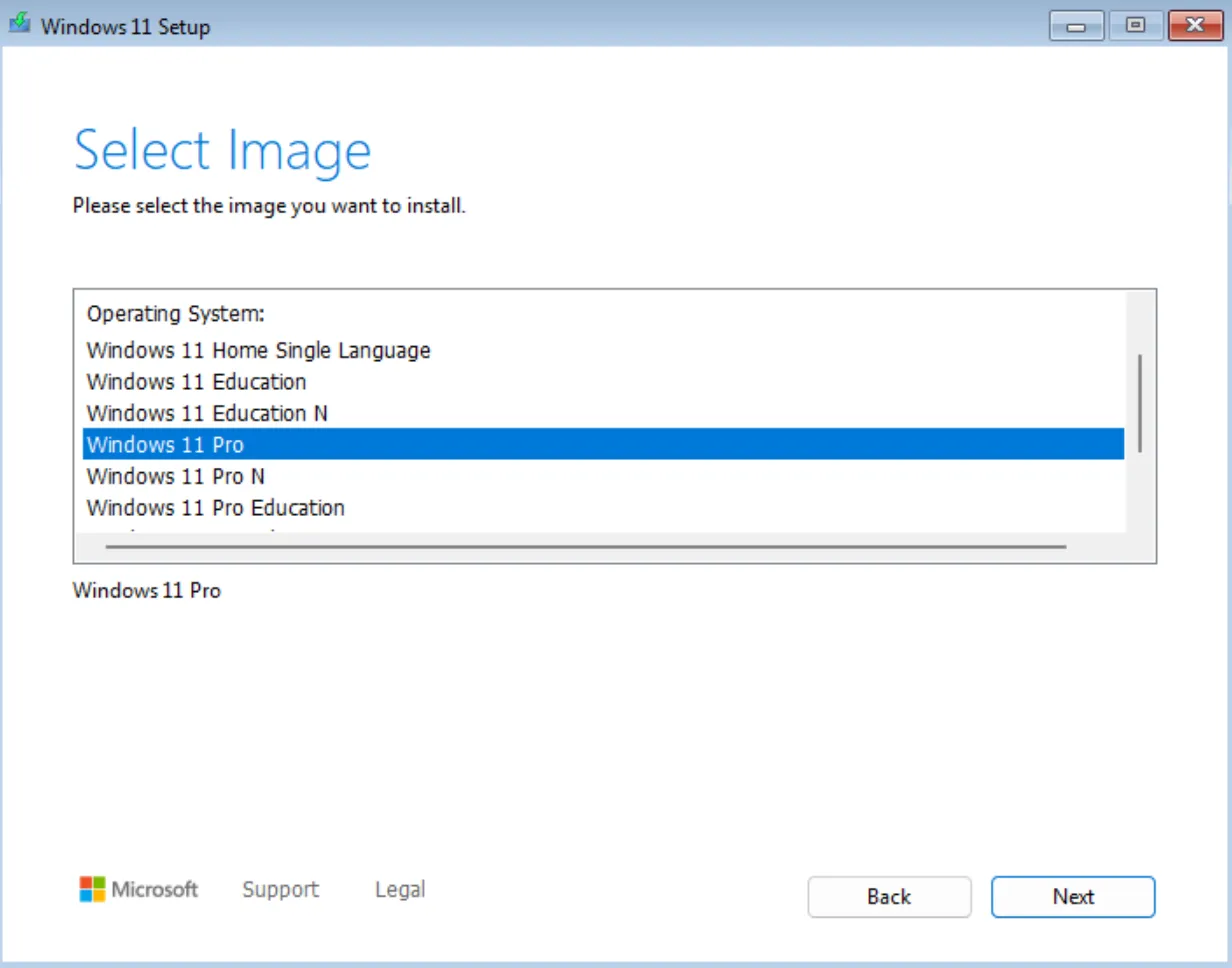
Screenshot: Choose Windows 11 Pro, not N, not education, etc.
5.4) Here’s where the fun begins.
– In this screen, if no disks appear, you must load your storage driver manually. Click Load Driver, browse for it in the USB drive and hit ok. It should install and the drive should now appear. If you see this, we’re golden→
– If you have multiple drives, I recommend deleting everything to have a fresh experience.
Extra-paranoid tip: If you have more than one internal drive, unplug the others before install. Prevents Windows from stashing boot files on the wrong disk or you wiping the wrong one.
– Highlight the drive where you want Windows installed. That will be your C: Drive.
If you have a single big drive but want multiple partitions (C: D:) you can click create partition, set the size in MB, and apply.
– Remember to keep the highlight on the drive you want the C: to be in.
– If you have a single drive, just highlight it and click next. For multiple drives, you can do the same, as we’ll configure D: E: etc. after we’ve installed everything.
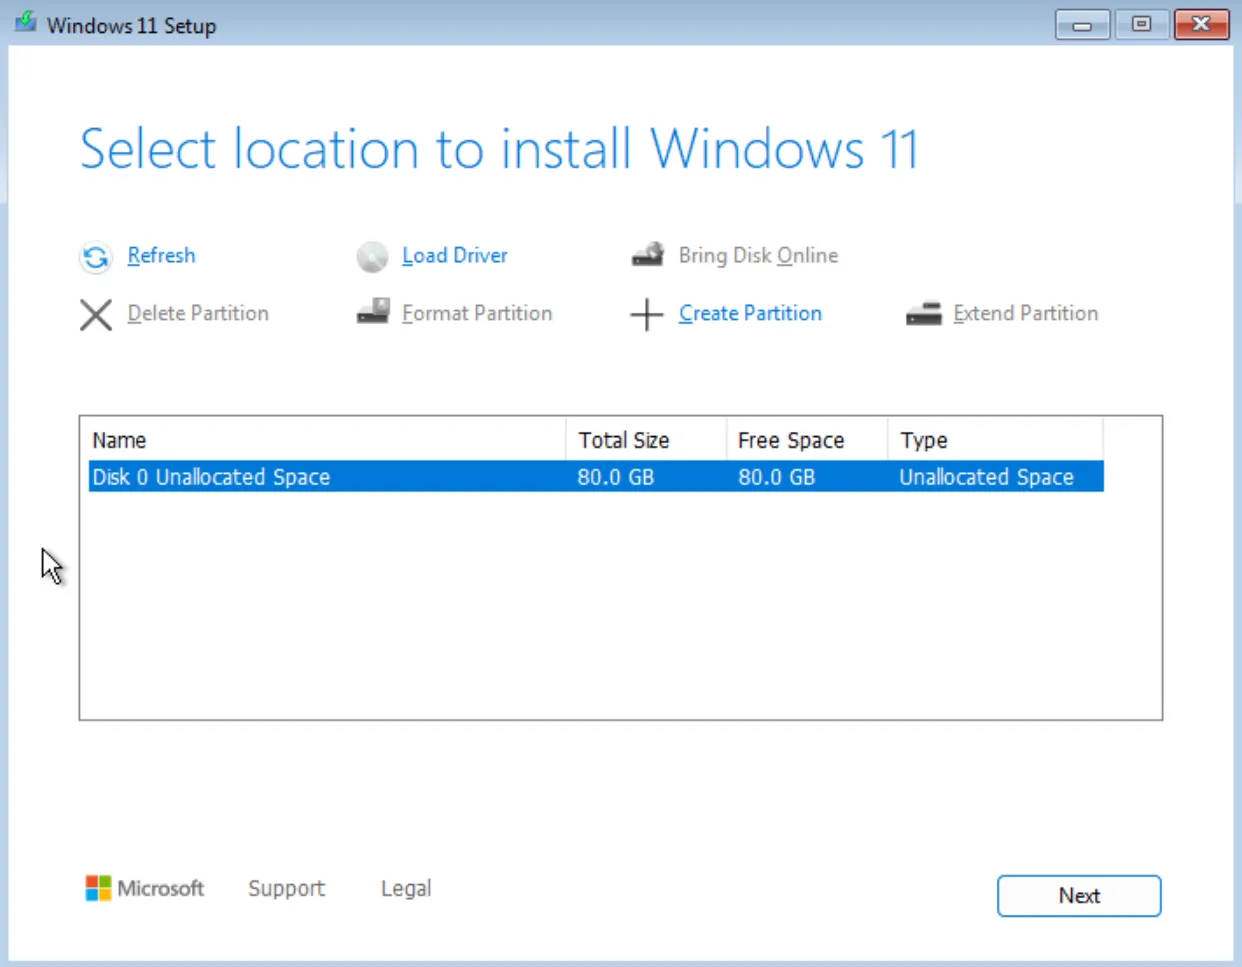
Screenshot: Take extra care to have the correct drive highlighted.
Common error: In the disk screen, if you see “Windows can’t be installed to this disk (MBR/GPT)”:
– HitShift+F10. It will open an elevated command prompt
– Type diskpart and hit enter
– Then select disk *yourdiskhere* and hit enter (disk 0 or disk 1 etc.)
– Then typeclean
– Thenconvert gpt (or mbr for oldies)
– Finally, typeexit
5.5) Wait
– Wait for this bad boy to load up.
– After this one, a black screen will appear.
– Wait some more.
– It will restart.
If after the restart, the Windows setup screen from earlier re-shows up, remove the USB Drive and cancel the installation prompt, or reset the computer directly.
(BIOS is still prioritizing the USB Drive instead of the fresh Windows install on your device. It’s safe, because Windows is already on your disk.)
I left another track here that I felt was fitting. Feel free to blast it.
5.6) OOBE… how I hate thee
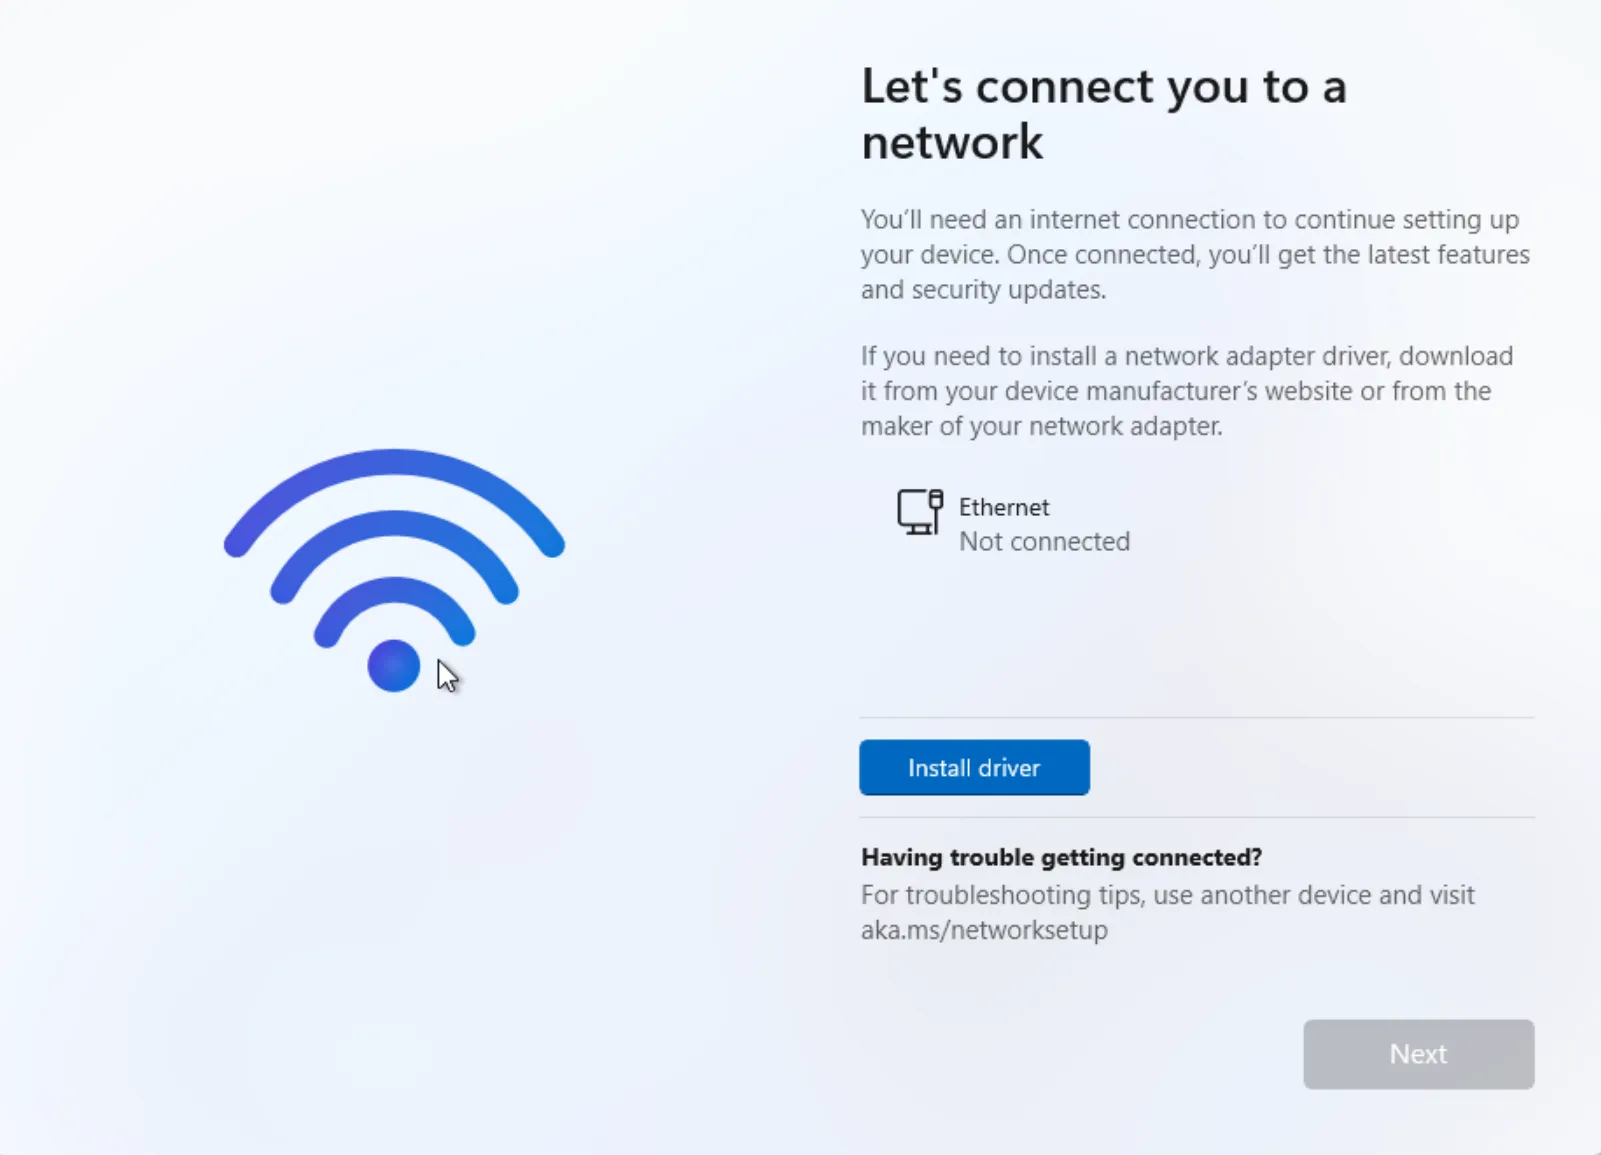
If all is well in love and digital, you’ll be greeted by the famous Windows OOBE (Out-of-Box Experience).
IMPORTANT STEP! Remove your ethernet cable or DON’T connect to any wi-fi network.
Next steps:
– If you configured Rufus correctly, you will have an “I don’t have Internet” option. Click it, and the PC will reboot. Starting Windows 11 25H2, it will normally request internet access to continue, but in this case, just click “I don’t have Internet” again (after the reboot), and it will let you create a Local Account directly (what we want). If it doesn’t let you continue without Internet, it means you didn’t check the boxes in Rufus. Recreate the USB and Reinstall Windows – it’s the cleanest way. If you don’t want to, try these steps below:
– Choose your country and hit “Yes”
– Skip the keyboard (you’ll see those screens again anyway).
– Here’s the fun part – the part where they want to force you to login with a Microsoft Account.
– When you reached the screen below, hitShift+F10– You will invoke a cmd prompt.
Screenshot: The hated Windows 11 modern OOBE – Out of Box Experience and how to bypass it, below.

– Type oobe\bypassnro. The system will suddenly restart – normal part of the process.
– If you get an error, check twice if you typed correctly, then try typing: %systemroot%\System32\oobe\BypassNRO.cmd
More fixes (Microsoft is trying to block bypassnro / Rufus didn’t apply the fix correctly):
– New (found by witherornot1337🔗). Be in the Shift+F10 command prompt and type “start ms-cxh:localonly” without the quotes. You should see a screen that will allow you to create a local account. – Using this will jump you directly to windows. Don’t be scared, just jump to the next step.
– If still any of this doesn’t work, don’t hesitate and write me a form🔗.
– If bypassnro worked, after restart, OOBE will greet you with the same regional stuff. Do it again. Configure your keyboard or skip it. (you can set it up later as you know).
– Stop here, in the same network config screen.
– Now, here is the hidden setting we’ve all waited for. The “I don’t have internet” option is your friend, as it lets you configure Windows without logging in to Microsoft. Click it.
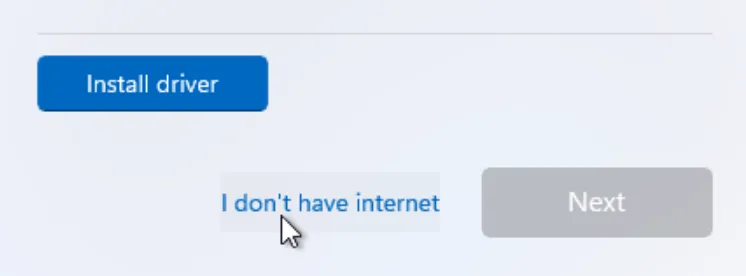
Screenshot: I DON’T HAVE INTERNET.
Subsequent steps:
– Who’s going to use this device? – This will be the name that will appear when you login and under C:\Users\*name*. Hit next.
– Use a secure password that you’ll actually remember and hit next.
– Don’t let Microsoft and apps use your location – you’ll use the browser for anything ever requiring location on a Windows device.
– Turn off Find my device (useless without an MS account).
– Diagnostic data – Required only (we’ll disable this as well, but later). Click accept.
– Don’t improve inking & typing. Don’t get tailored experiences with diagnostic data.
– he said, already breathing easy, knowing that no MS account or keyloggers are present. Take a break, grab a drink, listen to this banger:
Screenshot: When you see this, you’ll know you’re the champ. But we’re not done yet. Not by a long shot. Stay tuned.
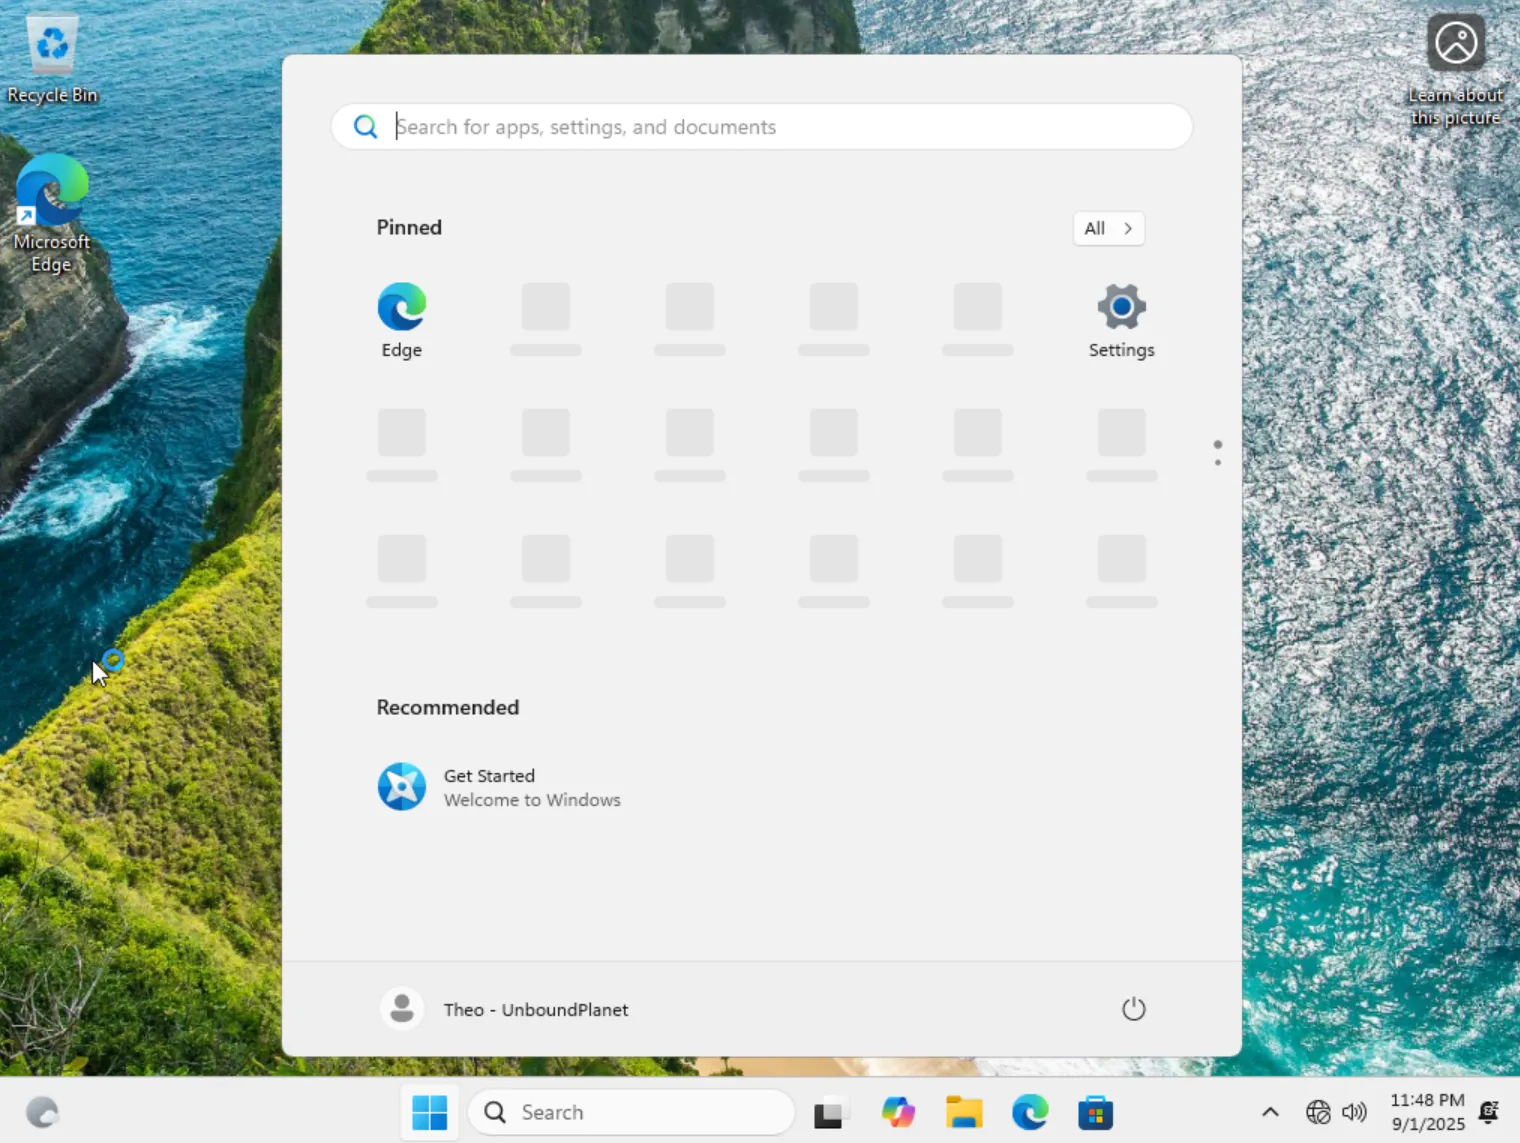
You’re in Windows 11 Pro AND without a Microsoft Account!
Pretty cool, right? Almost like installing a customer-centered OS.
You’ll notice that we have several nuisances – a Copilot button, Onedrive, etc. and we didn’t even plug the ethernet cable / connected to wi-fi yet!
1.1) A planetary mind
Plug in your ethernet cable now. If it’s not connecting, check in Device Manager, accessed by right clicking the start button. Open the Network Adapters dropdown.
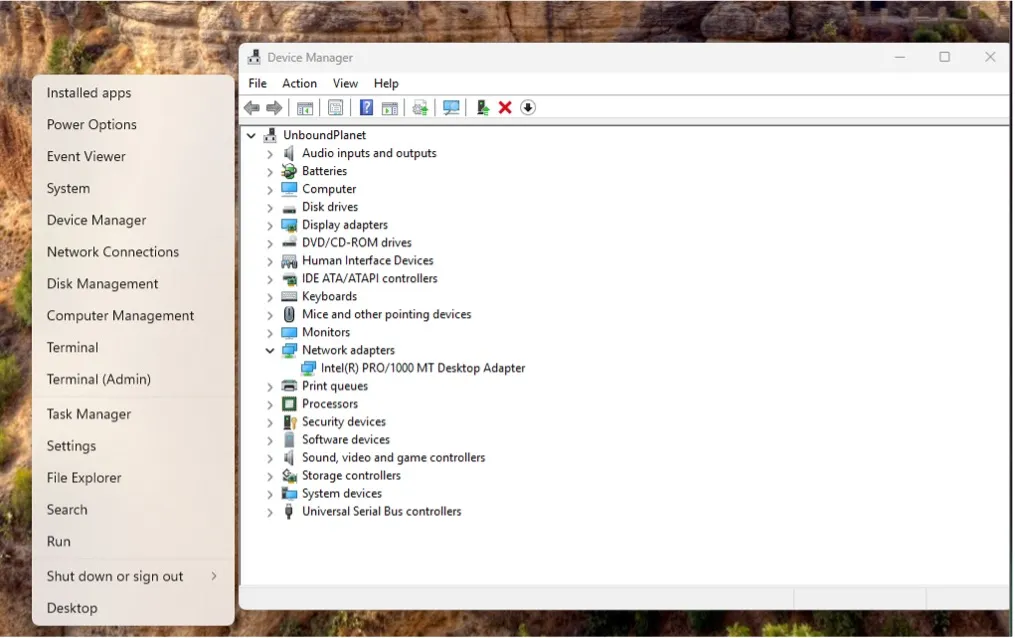
Screenshot: In Device Manager, check for any “Other” or yellow warning sign devices and update them.
– If nothing’s there, or the adapter’s icon has a yellow “!” warning sign, we gotta update its driver.
– Head onto the USB Drive (if you hadn’t plugged it back in, plug it now) – and install 7zip.
– It will automatically associate all archives with it.
– Install the network drivers from your manufacturer (and any other drivers if you’re already here).
– A restart might be needed (save time – install all, restart once at the end).
– Hopefully now you’ll have internet – if not, contact me🔗 and we’ll sort it out together.
Shortly after you’re online, you’ll see that things load, the screen might flash and get a crisp image after, the device gets a bit slow. It’s talking to Microsoft. It’s bringing all missing drivers (not the latest but the most reliable) and bloat to your device. It will also start downloading the latest cumulative update.
The plan is now to let him install everything he wants.
2.1) Mandatory updates
Right click the Start Menu, click settings and head to “Windows Update”. You’ll most likely see something like “Your PC is missing important security updates” – it’s going to be alright, we will install everything.
– Click the blue “check for updates” if you didn’t already.
2.2) Optional updates
Also, go into Advanced Options in the update menu and then Optional Updates. Check all Optional Updates and install them now.
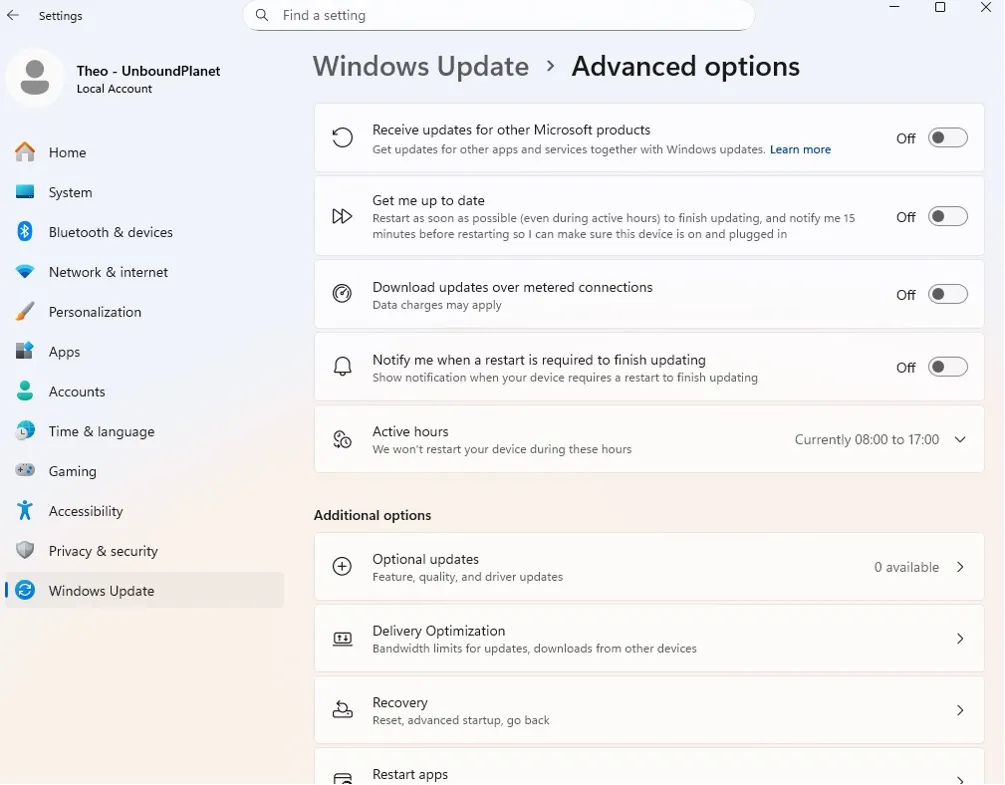
Screenshot: Always be completely up-to-date before installing AtlasOS.
2.3) Force it
Return to the main Windows Update settings screen and frequently check its progress – some updates from the list might require manually pressing on “Install” next to them, while others will require a restart. Again, I recommend to restart only once, when you see there’s no more activity.
2.4) UWP – You either like them or you don’t
Now go into the infamous Microsoft Store, it’s already in the taskbar, waiting for you.
– Click on Microsoft Store (yes, we have to update all UWP Apps). Fortunately, we don’t need a Microsoft Account to do it. (If it ever asks you to login, skip.)
– Click on downloads and then “check for updates”. It will have many, and it will take a while.
– Finished updating? Check again, there will be more.
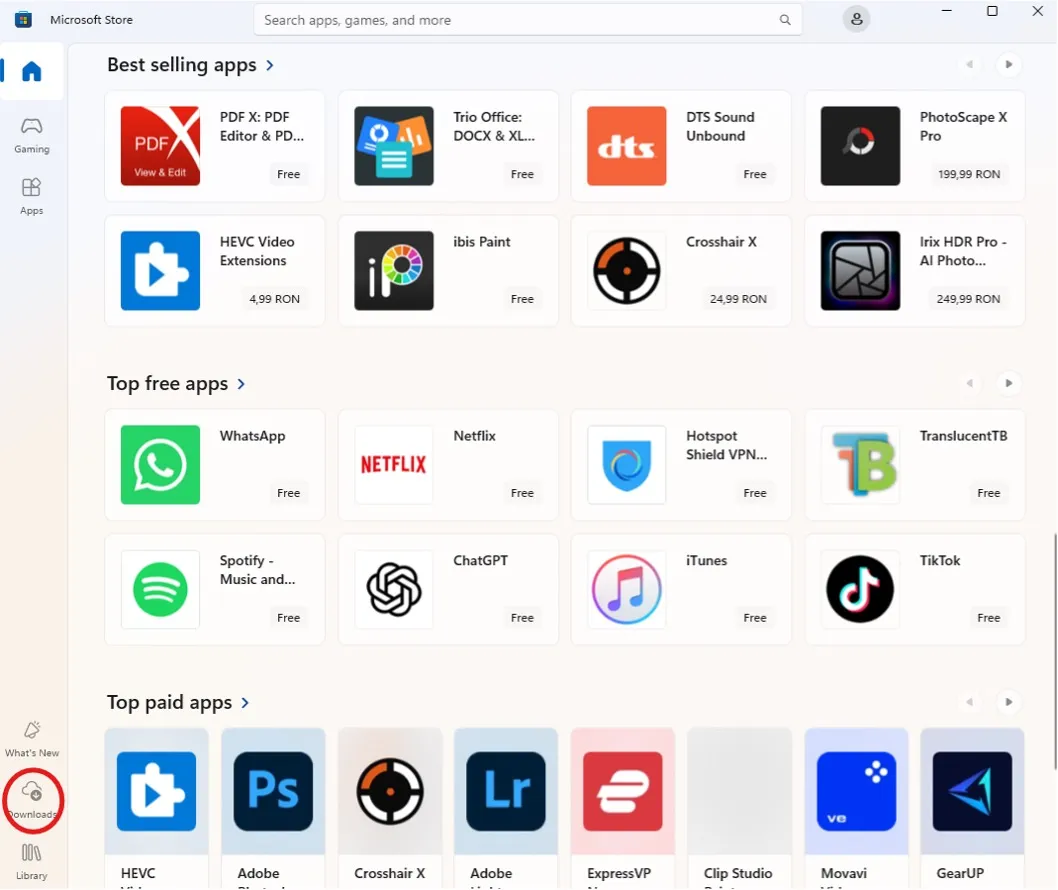
Screenshot: Update first, kill after. This is the cycle.
2.5) Update & activate jamboree
Juggle with MS Store Updates and Windows Update + one or two restarts depending on how many subsequent updates will come after restarting the first time – until both Windows Update and MS Store say “You’re up to date” and “All your apps are up to date”.
Reminder: If you really don’t want to pay Microsoft, you may see tools online that promise free activation by generating a HWID license – for example, Microsoft-Activation-Scripts🔗.
They often work, but they are not legal: they bypass Microsoft’s licensing model and can expose you to malware if downloaded from the wrong place. For a truly clean and future-proof setup, stick with retail or OEM keys from trusted sources.
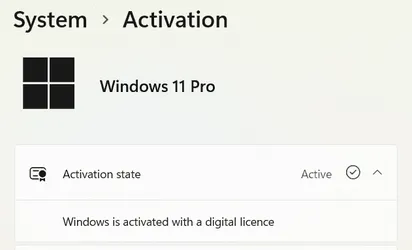
– Go into Settings > System > About.
– Scrolling down, you will find “Product key and activation”. Click on it.
– If it says “Active”, you’re golden. If not, add or change your product key.
– Note that with OEM keys, “Active” will show only if you’re connected online (once).
– For retail key people: if you choose to login to a MS account later (meh), the key will be saved to your MS Account, just FYI.
Screenshot: Be updated.
3.1) Warming up
The next thing is to (obviously) switch to dark mode and optionally disable the system sounds.
– Settings → Personalization → Colors → Choose your mode → Dark.
– Settings → System → Sound → More Sound Settings → Sounds tab → Sound Scheme → Set to “None”. Uncheck “Play Windows Startup Sound” if you want.
3.2) AtlasOS
Time to install AtlasOS. You might have already read about them🔗 if you reached this point.
If not, I’ll quote their heading “Over time, Microsoft has made Windows sluggish, clunky and invasive. Atlas brings life back to Windows, designed to maximize privacy, usability, and performance. We make Windows more responsive and less annoying, with many users also claiming improved framerates, while being configurable and compatible.” They have an installation guide, but I’ll set you up, because with this guide I aim to improve performance as much as possible without touching security as much as possible.
– Always make sure to download the official kit, from their site and not from some other.
– Go to https://atlasos.net/🔗 (just use Edge for now).
– Click on Get Started.
– Click on the text below the buttons “I’m following the guide, show me the downloads“.
– Check “I confirm I am following the installation guide.“.
– As previously stated, I recommend following mine because it’s easier and keeps stock security.
After you’ve copied the contents of both downloaded archives, you’ll end up with 3 files:
– The Playbook (AtlasOS scripts).
– The AME Wizard (Playbook applier).
– A .reg file “Disable Automatic Driver Installation.reg”. If you know what that .reg does, you’ll decide if you need it or not, for this guide, we’ll skip it, as most drivers have been fetched by Windows already (we only lack an up-to-date GPU driver for that waifu-themed RX9070).
3.3) Configuring AME Wizard
– Drag and drop the AtlasPlaybook_v0.5.0.apbx into the rounded square.
– Temporarily Disable Security by clicking “Run action” – it’s just temporary.
– It will show you what you have to do – Click “Open Windows Security“.
– Disable all things there: “Real-Time protection“, “Dev Drive protection“, “Cloud-delivered protection“, “Automatic sample submission“, “Tamper protection“.
– The settings window might close by itself, don’t be scared, nothing bad will happen – promise.
– Close the “Disable Security” AME window (If it says “Windows Security is Disabled”).
– Click Next.
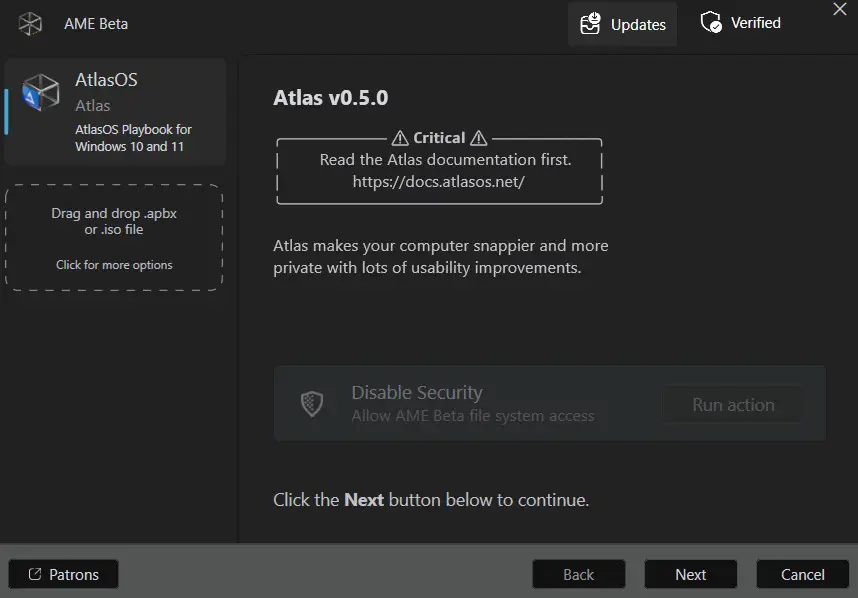
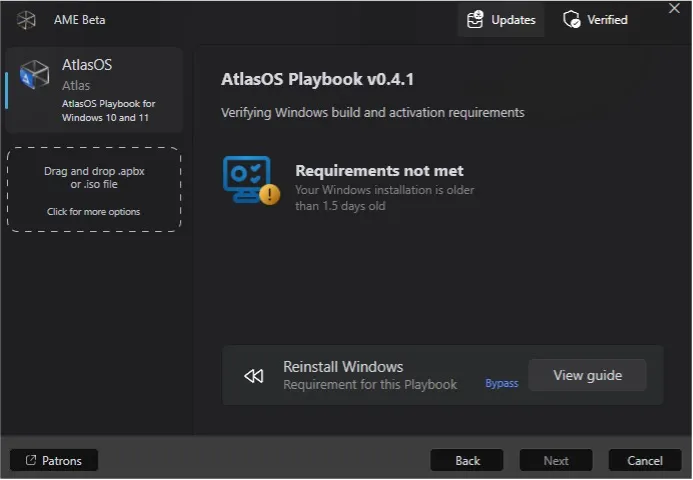
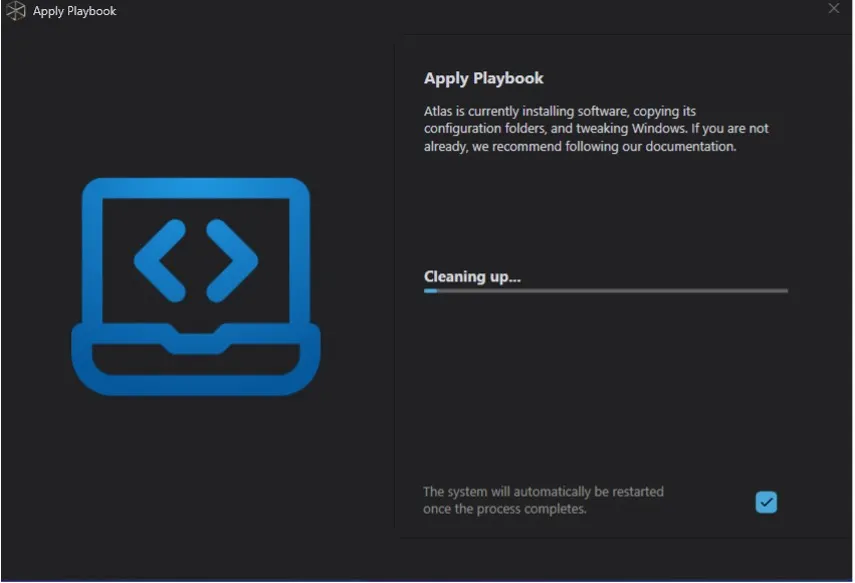
Screenshot: This is it. The climax.
If you see this:
– Just click on the little blue “Bypass” text. (doesn’t seem to appear anymore starting AtlasOS v0.5, but I’ll let it just in case)
– It tells you that “Requirements met”. Click next.
– Read the AME Core and AME GUI, then click next and Agree.
– The new version might also ask you to restart before continuing. It will restart and resume automatically (you’ll have a UAC prompt at restart and AME will resume).
Screenshot: Ignore, bypass. We have a fresh install, just took a nap in the meantime.
Set the following Options:
– Enable Defender (recommended)
– Default Windows Mitigations (recommended)
– Enable Automatic Windows Updates
– Uncheck all 3: “Disable Hibernation”, “Disable Power Saving”, “Disable Core Isolation”.
– On the browser + Snipping Tool window: your choice.
– Warning – if you choose “Remove MS Edge” and don’t check “Install a Browser”, you won’t have a browser (if you wanna go full portable, have a browser at the ready).
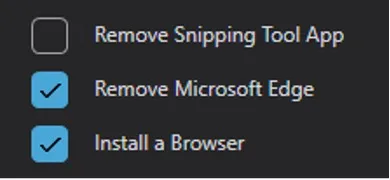
Screenshot: Install a browser, or uncheck if you have a portable at the ready. I usually leave it like this.
– Brave Browser recommended for privacy (not sponsored).
– Check “Install the new Atlas Toolbox BETA“. It will have easier access to the customizations which are described below.
– Configuration is done. Click next to continue.
Screenshot: Be patient, it might take a while.
– Leave the automatic restart checked and go grab yourself a drink.
– After restart there will be an update trigger (it’s just the optional apps being wiped).
– If no errors occurred (extremely rare), you will officially run the latest Windows 11 Pro + AtlasOS v0.4.1 and be rid of all bloatware!
– After it restarts, make sure Defender and Anti-Tamper is back on by going into Settings → Privacy & Security → Windows Security → Virus & Threat Protection → Manage settings → Turn everything back on.
4.1) An Unbound planetary mind
– Breathe easy, invoke the Task Manager, click on Performance and look at the number of processes. For me, it’s 87. Down from 200+ on vanilla. RAM is down to 2.2GB used. All telemetry and MS-phone-home is gone.
– You’ll see that there’s a lot of Atlas flavor. It ain’t for everyone (it isn’t for me). Well, time to change it.
– I’ll let you change your wallpaper and user profile picture by yourself.
– Uninstall NanaZip and switch back to 7zip if you prefer.
You’ll see that on your desktop there’s an Atlas shortcut. Leads to a folder with a lot of dials and tweaks. You’ll need that shortcut so move it, but don’t lose it! If you ever lose it, it points to:C:\Windows\AtlasDesktop
4.2) AtlasOS – Important settings to consider:
– If needed, re-enable file sharing:3. General Configuration - File Sharing
Run the “Enable File Sharing.cmd” and tap “Y” when asked to change your network profile to private (other prompts are optional).
– If needed, re-enable full search indexing: 3. General Configuration - Search Indexing
Run the “Enable Search Indexing.cmd”.
– If you want the new context menu back (the menu when you right click), go here: 4. Interface Tweaks - Context Menus - Windows 11
double click the “New Context Menu.reg”.
– Re-enable Removable Drives in Sidebar (USBs): 4. Interface Tweaks - File Explorer Customization - Removable Drives in Sidebar
“Enable Removable Drives in Sidebar.reg”.
– Disable compact view – if you prefer the more modern “aired” W11 design:4. Interface Tweaks - File Explorer Customization - Compact View
– If you have any Network issues, they have some fixes here: 8. Troubleshooting - Network
“Reset Network to Windows Default.cmd”
– Remember that AtlasOS also has the capability to disable mitigations and Defender
(to improve performance on really old PCs, but I don’t recommend this).
4.3) Removing AtlasOS’ customization
Now, if you go into Settings → System → About, you’ll see a lot of unpleasant stuff, in my opinion. If you’re like me, you’ll want it changed.
– Here’s where we create a little registry key that will replace that text.
I’ve created one for you, and can be downloaded here (we’ll edit it together anyway):
Clean: VirusTotal Report here🔗
⚠️ This .reg file modifies the Windows Registry. You should open it in Notepad first to inspect its contents before running. Only apply if you understand what it does.
Right-click on the desktop → New → Text Document. Rename it “custom-oem.reg” or “whatever-you-want.reg”, mine will be named “custom-OEM.reg”.
Whichever you have (yours or mine), right click, Open With → notepad (just once).
Replace the code inside the brackets below with whatever you want, while leaving everything else as-is. By default, Windows usually places the laptop model and manufacturer’s information or the PC Motherboard model.
If you want to leave something blank, just leave the brackets empty (“”).
Windows Registry Editor Version 5.00

[HKEY_LOCAL_MACHINE\SOFTWARE\Microsoft\Windows\CurrentVersion\OEMInformation]
"Manufacturer"="edit-here"
"Model"="edit-here"
"SupportURL"="edit-here"
"SupportPhone"="edit-here"

[HKEY_LOCAL_MACHINE\SOFTWARE\Microsoft\Windows NT\CurrentVersion]
"RegisteredOrganization"="edit-here"
BCDEDIT – If you ever install multiple Operating Systems on your PC, or have to enter safe mode, you’ll see that your PC is no longer running Windows 11, but “AtlasOS 11 v0.5.0”.
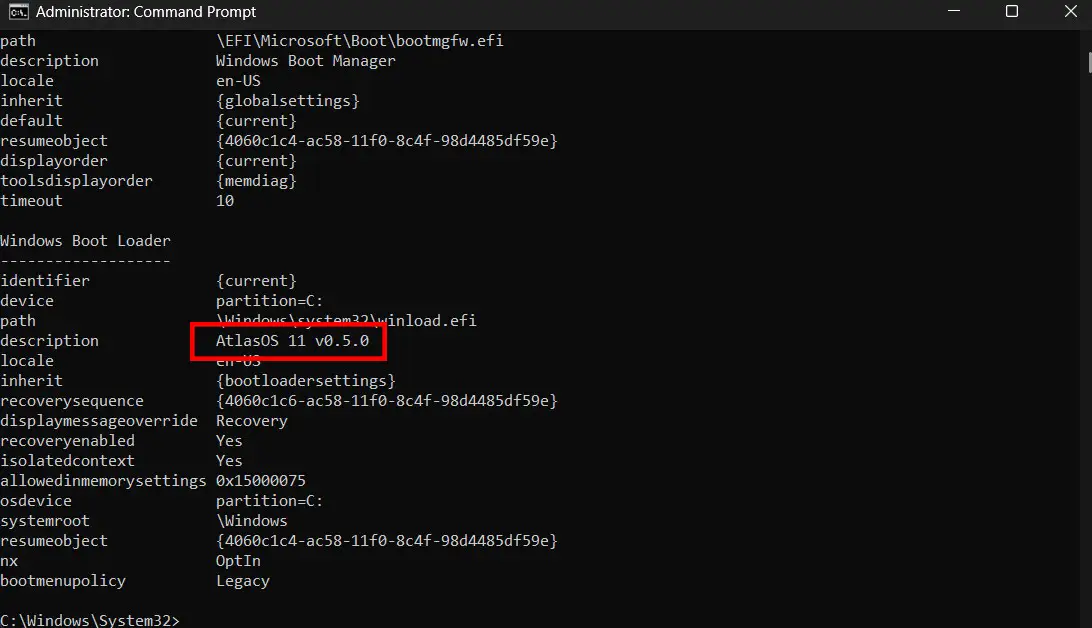
Screenshot: “bcdedit” in an admin cmd to see that.
I don’t like that – let’s switch it back to “Windows 11” – as it is by default.
– Open an elevated command prompt. Start → in the search bar type “cmd” → right click and “Run as Administrator”.
– Write the following: bcdedit
– Hit enter
You’ll see the current windows boot settings. See that the description flag in Windows Boot Loader is “AtlasOS 11 v0.4.1”.
Now type:bcdedit /set {current} description "Windows 11"
Done. Restart your computer.
– Final optional AtlasOS pruning. You’ll see that every time you create a new user on your PC, it will have the AtlasOS logo as the default. Let’s switch that back to the default Windows ones.
Below you’ll find all of the default user icons. Unzip them here:
C:\ProgramData\Microsoft\User Account Pictures
VirusTotal Report here🔗
✔️ Safe download: contains only static image files.
4.4) Final steps and tips
– Install your up-to-date GPU driver + other devices you need, and configure your other hard-drive in the section below, if needed.
– Create a system restore point – to revert to this sweet state in minutes (if anything goes wrong).
– Go into Device Manager again (right click start button → Device Manager), check if any devices appear in Other or have a warning sign. If so, refer to the manufacturer’s website to install any missing ones.
Start installing Portable Software:
One thing I hate about Windows is its cluttered registry and software that leaves remnants everywhere after deleting.
This is why I HIGHLY recommend PortableApps🔗, which lets you install software in a folder YOU choose and stays there. No strays, no garbage (unless absolutely needed – example: browsers will still leave stuff in UserAppDataLocal & Roaming).
Software:
For media I highly recommend:
– VLC player🔗
– HEIF Image Extension🔗 (for phone photos)
– Microsoft Powertoys🔗 – a ton of useful features
We left the configuring of the second drive now to have it sparkling and untouched by any of the noise before.
– Right click Start – Disk Management
– You’ll see a table in the first half of the window, and a detailed partition in the second half.

Screenshot: Focus on the second half of the UI.
– Scroll down in the second window until you find your drive – identify it by its size.
– Right click on it – New Simple Volume (or Initialize → GPT → OK, then New Simple Volume)
– Choose max size (or lower if you want more partitions from the same disk)
– Assign the letter, format in NTFS with Default Allocation Unit Size and quick format
– Finish.
We’ve cut the bloat and kept the course, with a clean and repeatable way to reclaim Windows and keep control in the user’s hands.
You now have a fresh, up-to-date Windows 11 Pro install with stock security intact and the right controls and tools when you need a nudge in YOUR direction.
On Nova, we strive for fewer moving parts and even fewer surprises. Thanks for reading and using this guide, you’re awesome.
Of course, much more stuff is coming soon, so:
Stay tuned right here, on Unbound Planet, with your favorite host.
–Theo
Contact me🔗 for suggestions, feedback, ideas.