

The Cleanest macOS Tahoe Install Guide (macOS 26) – Mac, Hackintosh, VM
time has come. reclaim macos, on metal, in a VM, or the last great hackintosh.

time has come. reclaim macos, on metal, in a VM, or the last great hackintosh.
Inside nova, we strip the friction and keep the control. Whether you’re installing macOS Tahoe (26) on a real Mac, spinning it in a VM for safe testing, or freezing time on a final-gen Intel Hackintosh, the mission input has been received and is proposing: fast, minimal, predictable. Below we’ll chart three paths: Mac, VM, and Hackintosh – then hand you a lean toolkit and repeatable checklists.
This page also contains my curated selection of Mac Apps, light and mandatory, in my opinion, updated for MacOS Tahoe. Jump to the Recommended Apps section🔗.
1.1) Fetch the official installer
– Goal -> have/Applications/Install macOS Tahoe.apppresent and complete.
– Supported Mac route: System Settings -> General -> Software Update and that’s it for you (you can still continue if you want a nuclear clean-up or want some debloating). Jump to section: Debloating🔗, Recommended Apps🔗.
– Terminal route (open Terminal.app):
softwareupdate --list-full-installers
softwareupdate --fetch-full-installer --full-installer-version 26.0.1
Did this screenshot seconds before they launched 26.0.1 😑
⚠️ Note 1: Replace 26.0.1 with the latest exact version shown in the list.
⚠️ Note 2: New point releases may hit Software Update before they show in softwareupdate. If you don’t see the newest in CLI, just use what’s available and update post-install.
Ifsoftwareupdate --list-full-installerslags behind, install with the available build and patch via Software Update after install.
While waiting for the download (17GB+), go get yourself a drink and listen to this amazing tune.
– Finished? Sanity check:
ls -lh /Applications | grep -i "tahoe"
mdls -name kMDItemVersion /Applications/Install\ macOS\ Tahoe.app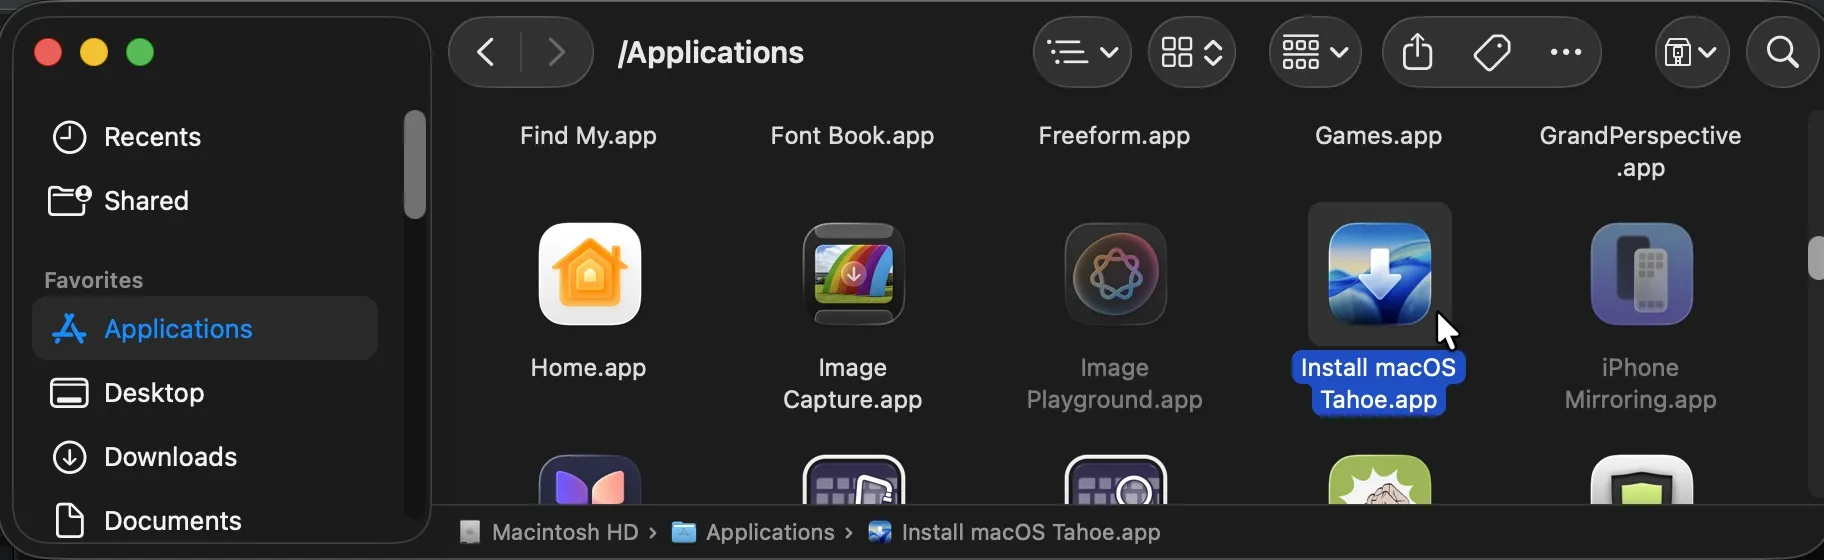
1.2) Create a bootable USB with createinstallmedia
– If you’re making a VM, you can jump to 1.3 now🔗.
– Insert a 32 GB+ USB stick.
– Identify it:
diskutil list
– Careful what you delete here! Erase it clean (replace X with your disk number):
diskutil eraseDisk JHFS+ TahoeUSB GPT /dev/diskX
– Build the installer
sudo /Applications/Install\ macOS\ Tahoe.app/Contents/Resources/createinstallmedia --volume /Volumes/TahoeUSB --nointeraction
While it copies, I left you another cool song:
Done? Result = The USB will be renamed by macOS as the installer volume.
How to boot (supported Macs only)
– Apple silicon boot -> shut down, hold Power until Options, choose the USB.
– Intel Mac boot -> hold Option at chime, pick the USB.
– Then Jump to Accordion 2) now🔗, the rest in this section is for VMs and Hackintoshes only.
Hackintosh boot: add your OpenCore EFI
diskutil list
diskutil mount /dev/diskXs1
# copy your EFI folder (from your OpenCore build) onto the mounted EFI volume
– Replace X with the disk number shown for your USB. Always mount the s1 (EFI) slice – that’s where OpenCore’s EFI folder goes.
– GPU rule: AMD Polaris/Vega/Navi only. NVIDIA not supported (last time mentioning this).
– Important instructions on the official OpenCore Install Guide here🔗
1.3) Build a DMG and convert to ISO (for VMs only)
– If you’re on a real Mac or making a Hackintosh, skip this.
– Create an empty DMG:
hdiutil create -o ~/Tahoe -size 24g -volname Tahoe -layout SPUD -fs HFS+J
– Attach it:
hdiutil attach ~/Tahoe.dmg -noverify -mountpoint /Volumes/Tahoe
– Lay down the installer:
sudo /Applications/Install\ macOS\ Tahoe.app/Contents/Resources/createinstallmedia --volume /Volumes/Tahoe --nointeraction
– Detach and convert to ISO:
hdiutil detach /Volumes/Install\ macOS\ Tahoe
hdiutil convert ~/Tahoe.dmg -format UDTO -o ~/Tahoe
mv ~/Tahoe.cdr ~/Tahoe.iso
This shouldn’t take long. You now have~/Tahoe.isoready for VMs. If you have a 32GB+ USB hanging around, here’s how to prepare it (as always, replace X with thediskutil listUSB number):
diskutil eraseDisk ExFAT MyUSB MBR /dev/diskXYou’ll end up with both a DMG and an ISO. The ISO is what you’ll actually mount in a VM. Keep or delete the DMG once you’ve verified the ISO. Move the .iso to your PC.
VM Boot:
Remember to use the macos unlocker prior to creating the VM.
VMware baseline (create VM first, then adjust):
– Name: macOS Tahoe
– Type: MacOS 15 (or whichever is the latest being shown).
– Memory: 8192 MB to 16384 MB
– CPUs: 4+
– In Processors, uncheck all “Virtualization Engine” options
– Network: NAT is fine for install
– USB: 3.1
(Optional) 1.4 Verify label, size, and checksums– Image info:
hdiutil imageinfo ~/Tahoe.iso
Hash on Mac:
shasum -a 256 ~/Tahoe.iso
Hash on Windows:
CertUtil -hashfile C:\path\to\Tahoe.iso SHA256
Wow, you’re booted to the installer first try? Damn, amazing! No really, I hope you’re ok and didn’t rip your hair out trying to make it show up.
Well, if you’re on any machine and see this (first one for new systems, right one for existing systems):
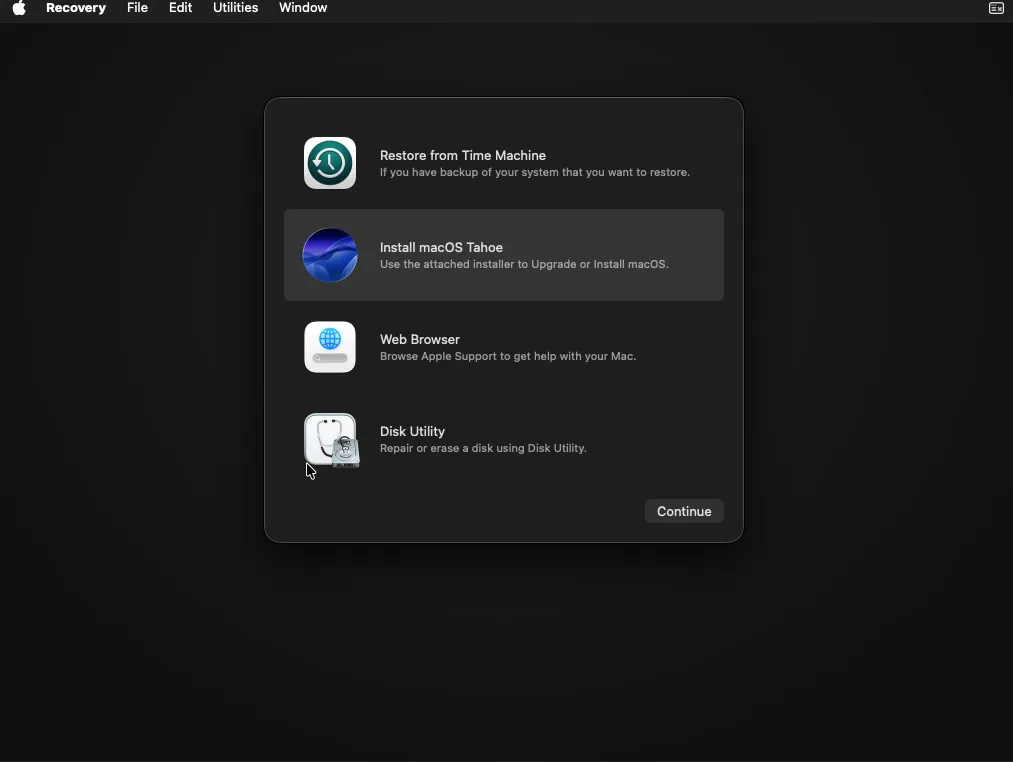
You’re one step closer into Apple’s ecosystem. If you reached the Recovery screen, the installer media is working. Continue with disk erase and installation.
For people who have had previous installations (especially on official Macs), and struggle to properly wipe the disk via Disk Utility, getting errors such as “Disk is in use.”, please see Section 3.1, Issue #6🔗.
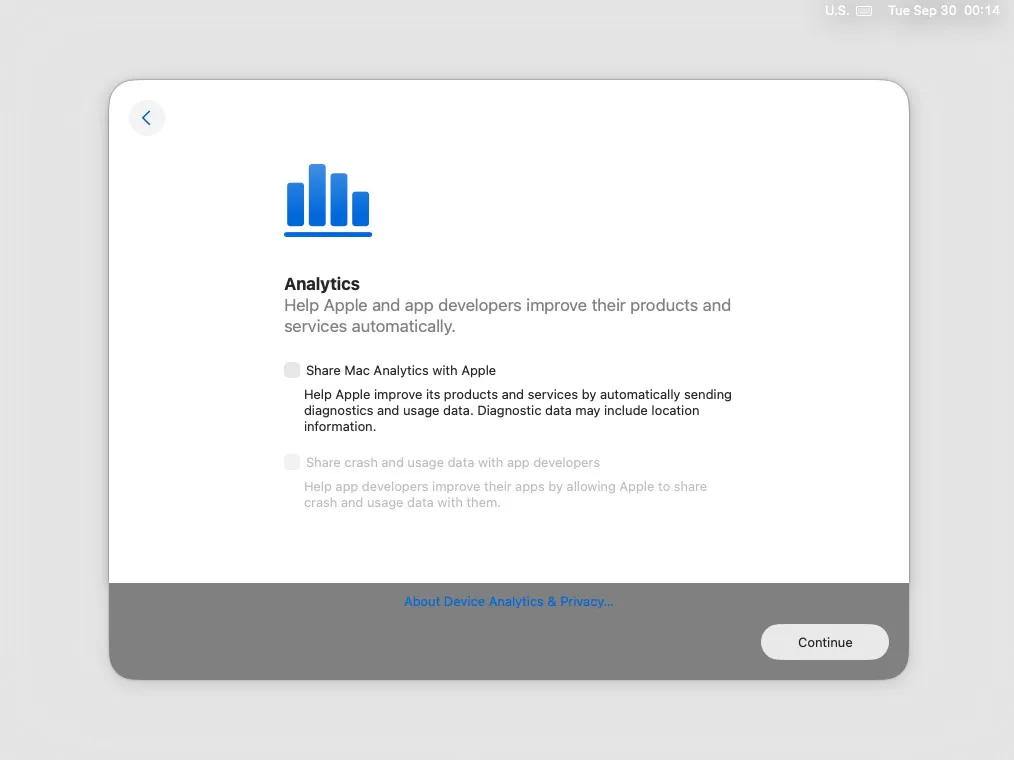
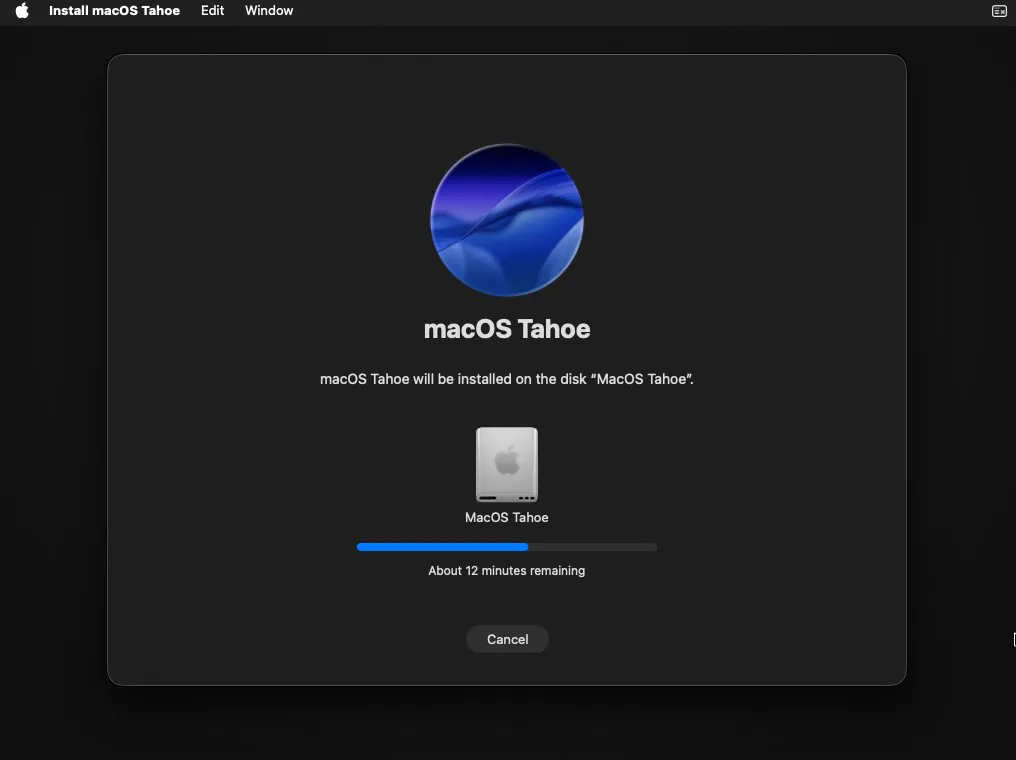
Follow the installation prompts (easy as pie). Just remember, skip the Apple Account login, especially for VMs/Hackintoshes! Uncheck “Share Mac Analytics with Apple” and disable FileVault. Don’t be scared of the slowness/ugliness, as there is no Video Acceleration, it’s what it is. It will get better after you install VMware Tools.
Jump to section: Boot issues on official Macs🔗, Boot issues on Hackintoshes🔗, Boot issues on VMs🔗.
3.1) Troubleshooting official Macs, clean install
Goal -> hold Power (Apple silicon) or Option (Intel T2/non-T2), see the installer USB, boot it.
Common issues and fixes:
Issue #1: USB doesn’t show in Startup Options
Solution #1:
– Check the stick: must be GUID + HFS+J and created via createinstallmedia.
– Recreate if in doubt. Try another port or a direct adapter (avoid hubs).
– On Intel Macs with T2: allow external boot. Boot to Recovery -> Utilities -> Startup Security Utility -> set External Boot -> “Allow booting from external media”.
– If FileVault is on, unlock the internal disk in Startup Options first, then the USB may appear.
Issue #2: Stuck at Apple logo or progress bar barely moves
Solution #2:
– Some USBs are just too slow. Use a better USB 3.0 stick.
– Recreate the USB and watch Terminal for a clean createinstallmedia finish.
– Disconnect all non-essential peripherals.
Issue #3: “This copy of the Install macOS application is damaged”
Solution #3: Usually incorrect date or incomplete installer. Connect to Wi-Fi in Recovery and try again, or rebuild the USB from a freshly downloaded installer.
Issue #4: Can’t select the USB as a startup disk from macOS
Solution #4: Use the hardware picker instead:
– Apple Silicon -> Shut down -> Hold Power until “Options” -> Pick the USB.
– Intel -> Restart -> Hold Option -> Pick the USB.
Issue #5: You boot, then the installer loops back to the picker
Solution #5: The USB may be fine but the target disk isn’t. Erase the target drive in Disk Utility as “APFS” with “GUID Partition Map” and try again.
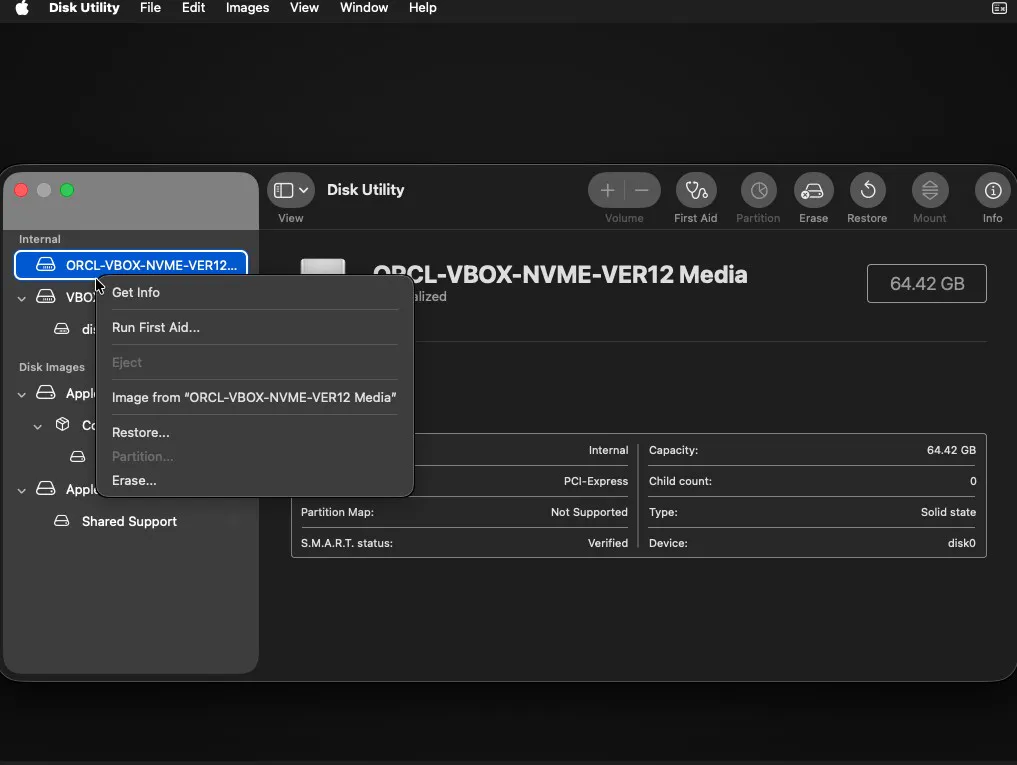
Issue #6: Happened to me! Disk Utility when wanting to nuke-wipe clean the Apple SSD: The disk is “in use and can’t be wiped” or similar error.
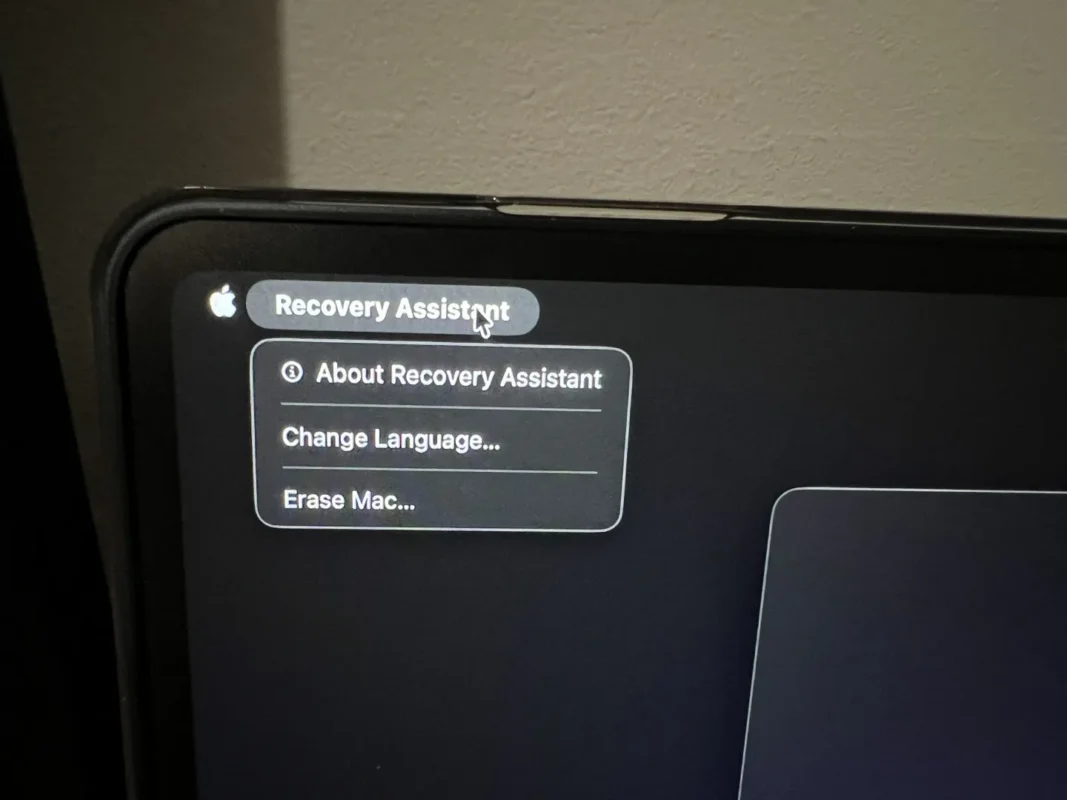
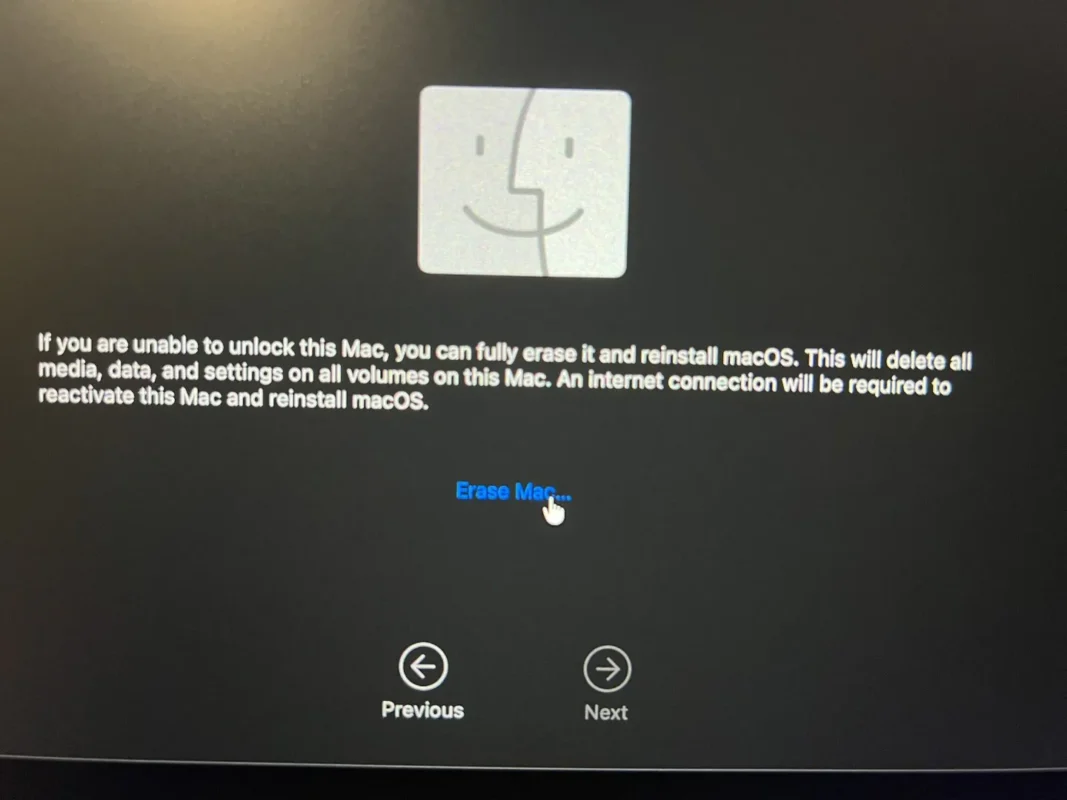
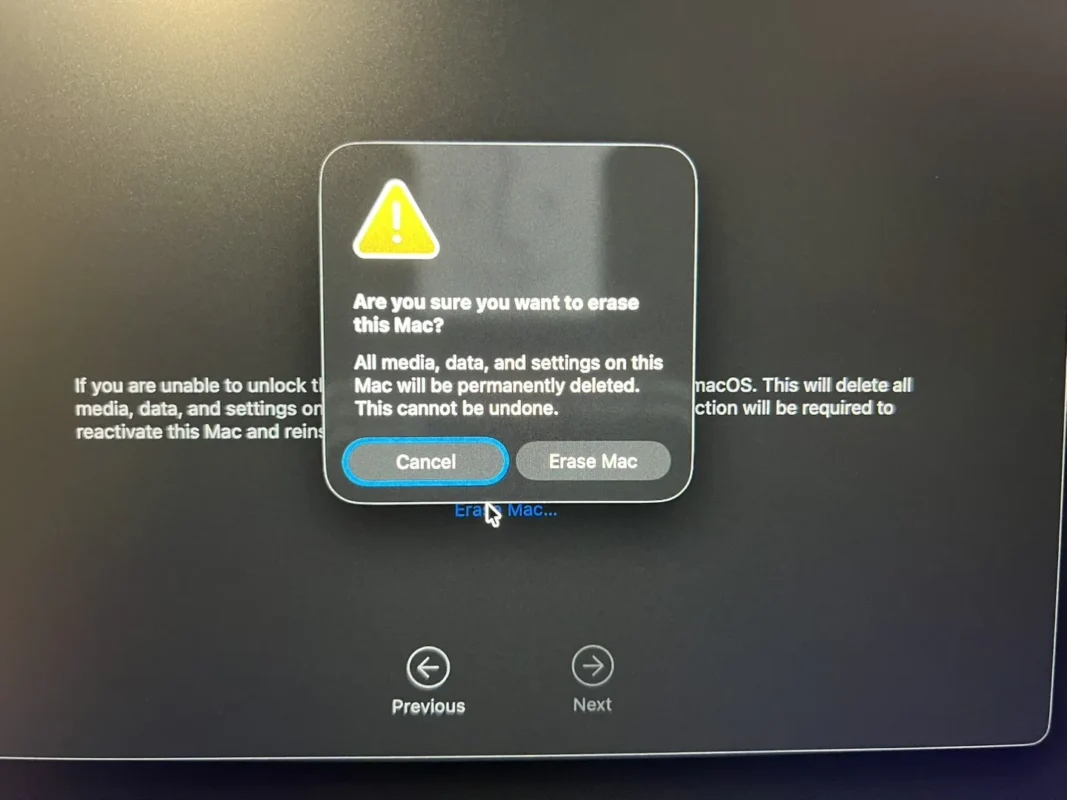
Solution #6: Go to the Recovery Assistant. Click on the Recovery Assistant title in the top bar and click on Erase Disk. It’s the only way. Warning – all Data will be wiped completely. See the Gallery below for Solution #6.
3.2) Hackintoshes troubleshooting
Goal -> see the OpenCore picker, select the “Install macOS” volume, reach the GUI.
Baseline BIOS setup (double-check):
– SATA mode -> AHCI
– UEFI boot -> On
– CSM -> Off
– Fast Boot -> Off
– XHCI Hand-off -> On
– If iGPU used: set DVMT Pre-Allocated to 64M or 128M if available.
Common issues and fixes:
Issue #1: If the USB doesn’t appear in OpenCore:
Solution #1:
Your EFI partition likely lacks the OpenCore EFI, or ScanPolicy hides external drives. Enable scanning for external in OpenCore.
– Mount the USB’s EFI and copy your EFI folder:
diskutil list
diskutil mount /dev/diskXs1
# copy your OpenCore EFI folder into the mounted EFI volume
Issue #2: If you freeze early in boot (verbose shows USB/kext spam):
Solution #2:
– You are using a temporary USB configuration. On modern macOS, XhciPortLimit is not reliable. Minimal map during install is OK, but a proper USB map is strongly recommended before daily use.
– Try another port (back panel vs front header). Some boards only expose a few ports pre-install.
Issue #3: If you hang near the Apple logo with a tiny progress:
Solution #3:
– GPU pathing issue. For AMD Navi/Big Navi add boot-arg agdpmod=pikera.
– If iGPU only, ensure WhateverGreen is present and the correct AAPL,ig-platform-id is set per Dortania.
Issue #4: Kernel panics or reboots:
Solution #4:
– Check kext load order: Lilu first, then plugins (WhateverGreen, AppleALC), then network kexts.
– Verify SecureBootModel and SMBIOS choice match your GPU path.
– If CFG-Lock is on and can’t be disabled in BIOS, enable the OpenCore CFG-Lock quirk.
Tip #1: Resetting NVRAM from OpenCore picker often helps when tweaking: pick “Reset NVRAM”, then boot again.
Tip #2: For exact plist and kexts -> use the Dortania OpenCore Install Guide🔗 for your platform.
3.3) Boot from ISO (VMs) troubleshooting
Goal -> attach Tahoe.iso and reach the installer. Remember: this is educational on a non-Apple host.
Common issues and fixes:
Issue #1: If you get a UEFI shell instead of the installer:
Solution #1:
press Esc at power-on -> Boot Manager -> select the EFI VMware Virtual SATA CDROM entry. Or from the shell:
# In the UEFI shell:
fs0:
\System\Library\CoreServices\boot.efi
Issue #2: If the VM resets immediately or shows a black screen
Solution #2:
– Reduce CPUs to 2. Ensure EFI is on. Keep VRAM default.
– Disable Windows Memory Integrity / Hyper-V / VBS if not already.
Issue #3: Installer loops back to the picker or never reaches GUI:
Solution #3:
Some setups need an OpenCore boot ISO in front of the Apple installer. Attach OpenCore ISO as SATA Port 0, Tahoe.iso as Port 1, boot OpenCore, then pick “Install macOS”.
Issue #4: Installer doesn’t detect mouse or keyboard.
Solution #4:
VM Settings -> USB Controller -> switch between USB 3.1 and USB 2.0.
Issue #5: Happened to me! Installer crashes during installation (kernel panics)
Solution #5:
Reduce RAM to 8192MB (then bump it back up after installation).
Issue #6: Happened to me! After OOBE finishes, the screen is white.
Solution #6:
Restart the VM.
Issue #7: Happened to me! OOBE is extremely slow.
Solution #7:
Normal, as there is no Video Acceleration unfortunately. You’ll have to adapt. It will get better once you’re inside the system.
Issue #8: Happened to me! Install macOS to the following Disk – menu is empty, no disks are found.
Solution #8:
Go into the VM Settings – Storage. Try preallocating the full size. Then in Disk Utility, Erase and Initialize the Virtual Hard Drive – in APFS. Run a First Aid after, for good measure. On VMs this will take a lot, so don’t be scared. As long as your cursor is moving, you’re fine.
Issue #9: Happened to me! Slower than expected macOS VM (even with no video acceleration)
Solution #9:
– Open the folder where you created the VM. You will find a vmware.log.
– Inside that log file, search for “Monitor”, you will eventually stumble upon:vmx Monitor Mode: ULM. In short = ULM bad and slow – Software Virtualization, CPL0 or HV good and fast – Hardware Virtualization.
– Kill all Hyper-V/VBS layers via an Admin Powershell:
# Fully disable Hyper-V stack
dism.exe /Online /Disable-Feature:Microsoft-Hyper-V-All
dism.exe /Online /Disable-Feature:VirtualMachinePlatform
dism.exe /Online /Disable-Feature:HypervisorPlatform
dism.exe /Online /Disable-Feature:Containers-DisposableClientVM

# Stop Windows hypervisor at boot
bcdedit /set hypervisorlaunchtype off
bcdedit /set vsmlaunchtype off
– Turn off Core Isolation – Memory Integrity:
Settings -> Privacy & Security -> Windows Security -> Device Security -> Core isolation.
– If VMware still logs ULM, nuke VBS flags:
reg add "HKLM\SYSTEM\CurrentControlSet\Control\DeviceGuard" /v EnableVirtualizationBasedSecurity /t REG_DWORD /d 0 /f
reg add "HKLM\SYSTEM\CurrentControlSet\Control\DeviceGuard" /v RequireMicrosoftSignedBootChain /t REG_DWORD /d 0 /f
reg add "HKLM\SYSTEM\CurrentControlSet\Control\DeviceGuard" /v WasEnabledBy /t REG_DWORD /d 0 /f
reg add "HKLM\SYSTEM\CurrentControlSet\Control\DeviceGuard\Scenarios\HypervisorEnforcedCodeIntegrity" /v Enabled /t REG_DWORD /d 0 /f
– Edit the .vmx file with Notepad and add:
monitor.virtual_exec = "hardware"
monitor.virtual_mmu  = "automatic"
Check vmware.log – and search for monitor again, it must show “CPL0” or “HV”.
Hope this solves your issues. If not, please, contact me – we’ll try to work it out.
You’re in MacOS! Nice. Let’s start debloating.
1.1) Let Tahoe settle
– It will grind for a good while, depending on your hardware. The new Liquid Glass interface is waste-computing stuff, and in Apple fashion, there’s not much we can really do about it.
– Scope of the guide -> Debloat and smooth out without disabling SiP (the protection that when disabled, you can delete built-in apps, edit all settings). Apple will re-enable it after updates anyway, and VM snapshots hate root tweaks.

Wait for stuff to load. Be patient, especially in a VM environment.
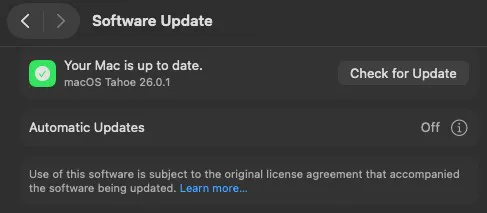
1.2) Patch up first
– System Settings -> General -> Software Update -> install the latest 26.x.x.
– Reboot once. Fewer surprises later.
Wait for stuff to load. Be patient, especially in a VM environment.
1.3) Turn down motion and eye candy as much as possible
Unfortunately, starting macOS 26 onwards, all UI is GPU composited, so there’s a lot of compute-waste. Just imagine if they kept Sequoia’s UI simplicity combined with these latest optimizations (on some Apple Silicon models, battery life improved on Tahoe). We’ll turn down whatever we can here:
– Settings -> Accessibility -> Display -> Reduce transparency -> On
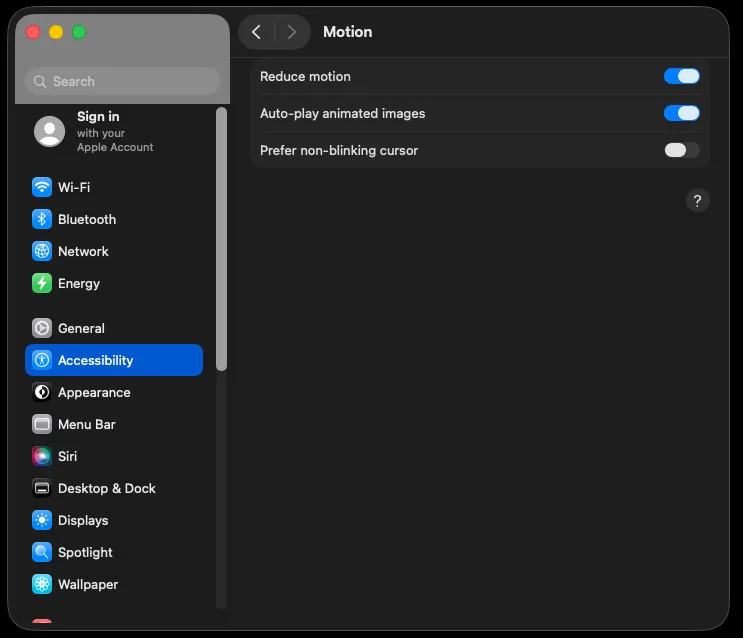
– Settings -> Accessibility -> Motion -> Reduce motion -> On
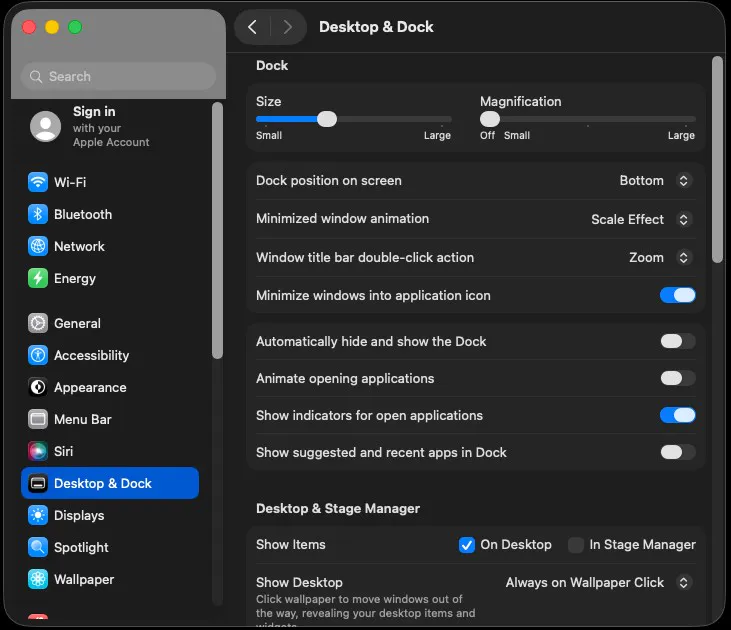
– Settings -> Desktop & Dock -> Minimized window animation -> Scale Effect
– Settings -> Desktop & Dock -> Animate opening applications -> Off
– Settings -> Desktop & Dock -> Stage Manager -> Off
– Settings -> Desktop & Dock -> Hot Corners… (bottom right) -> all on “-“
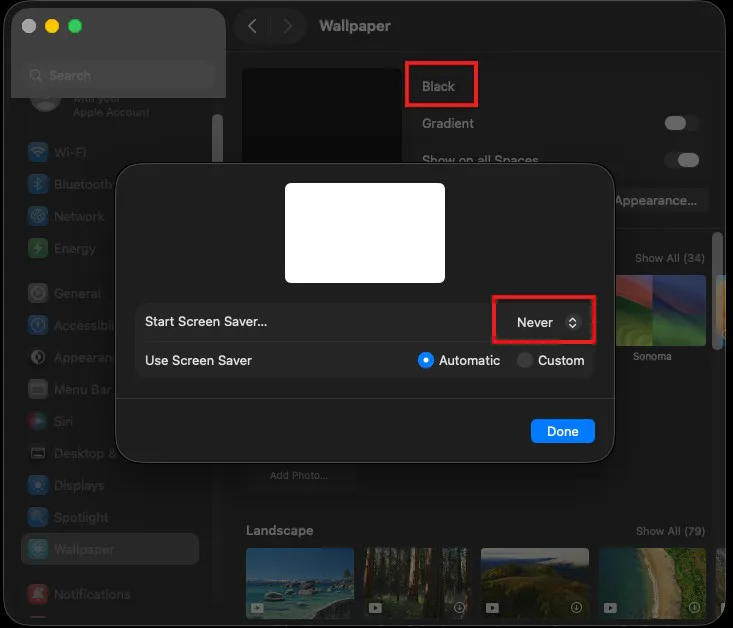
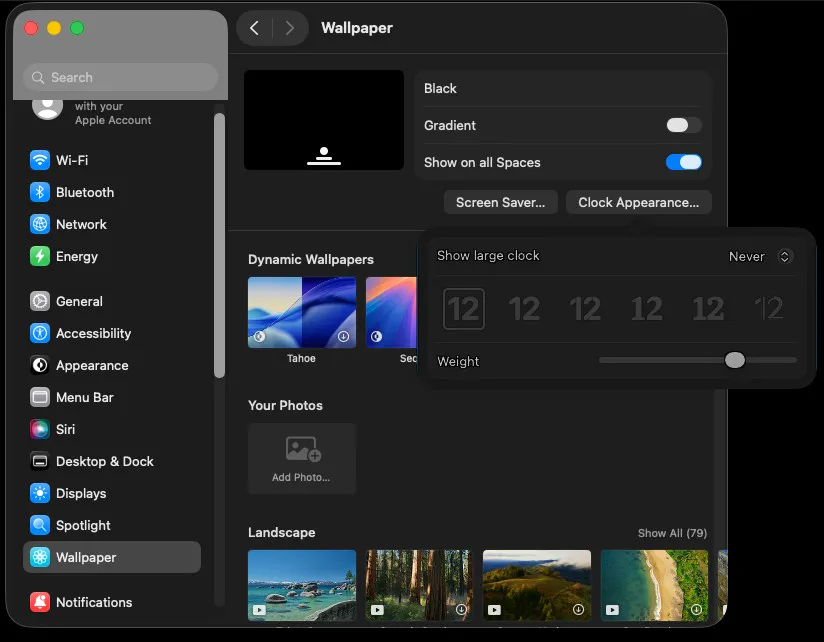
– Settings -> Wallpaper -> Pick “Black” – especially for VMs
– Settings -> Wallpaper -> Screen Saver… -> Start Screen Saver… -> Never
– Settings -> Wallpaper -> Clock Appearance… -> Show large clock -> Never
Even disabling the blur, reflection and refraction GPU compositing of the clock saves a few computes. For VMs, mandatory.
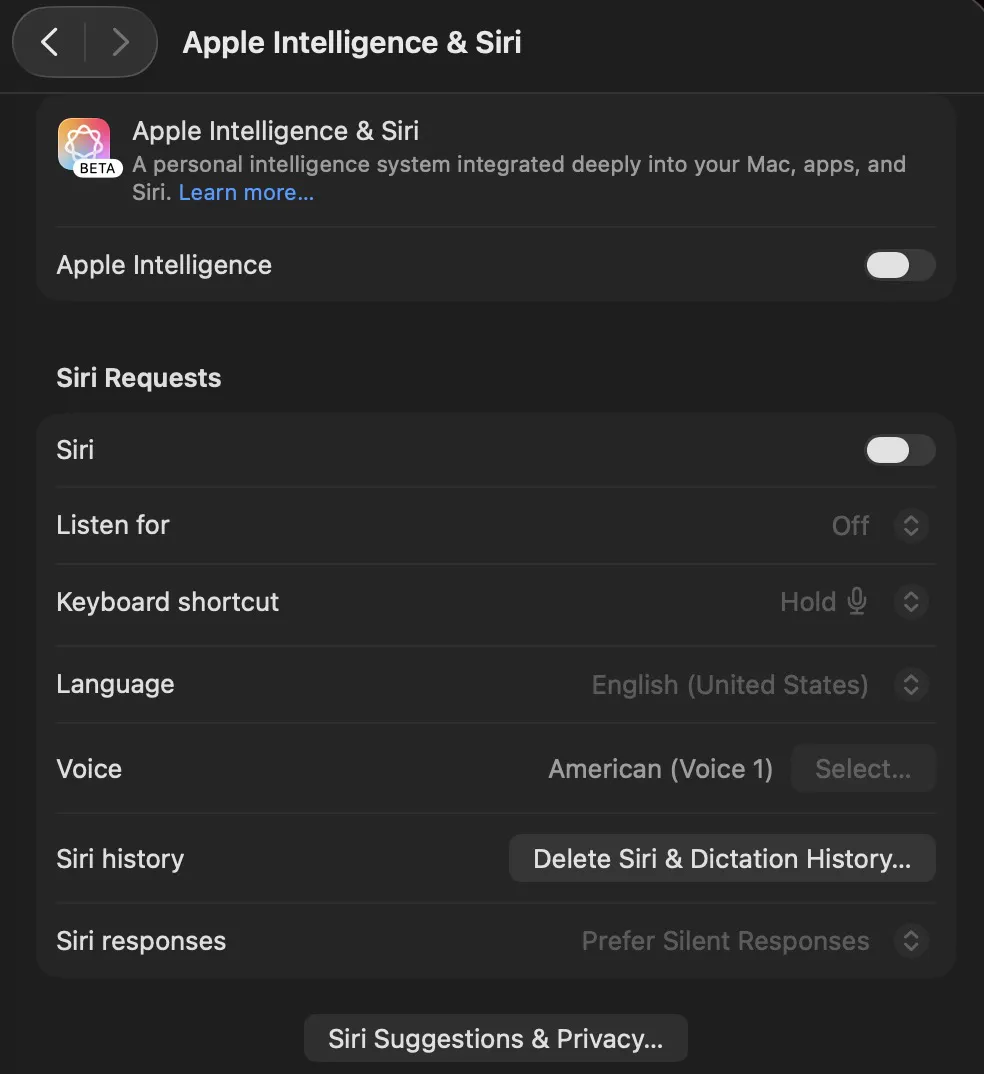
1.4) Turn off Siri, Apple Intelligence and Spotlight
Some bloat that can actually be disabled. You can leave Spotlight as per your use case:
– Settings -> Siri & Apple Intelligence -> Everything Off
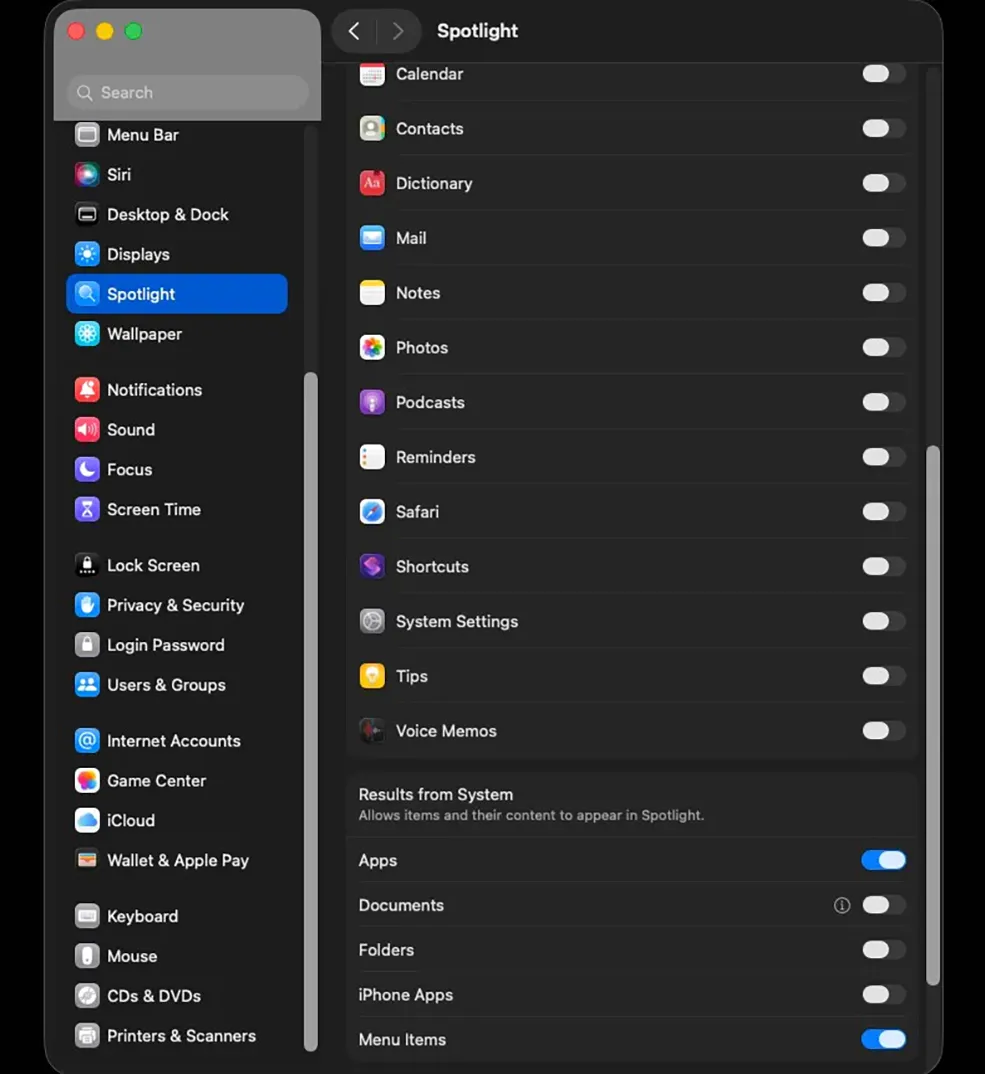
– Settings -> Spotlight -> All Off, keeping Apps and Menu Items “On” at minimum
1.5) Turn off Location Services, Notifications, more stuff
Some bloat that can actually be disabled. You can leave Spotlight as per your use case:
– Settings -> Privacy & Security:
– Analytics & Improvements -> Share Mac Analytics -> Off, Share with App Developers -> Off
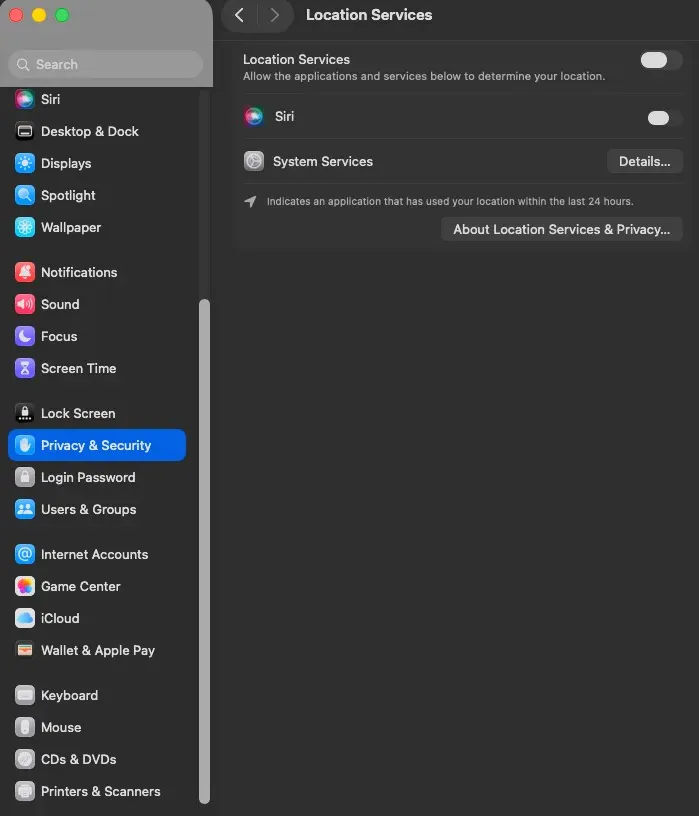
– Location Services -> Anything you can find -> Off
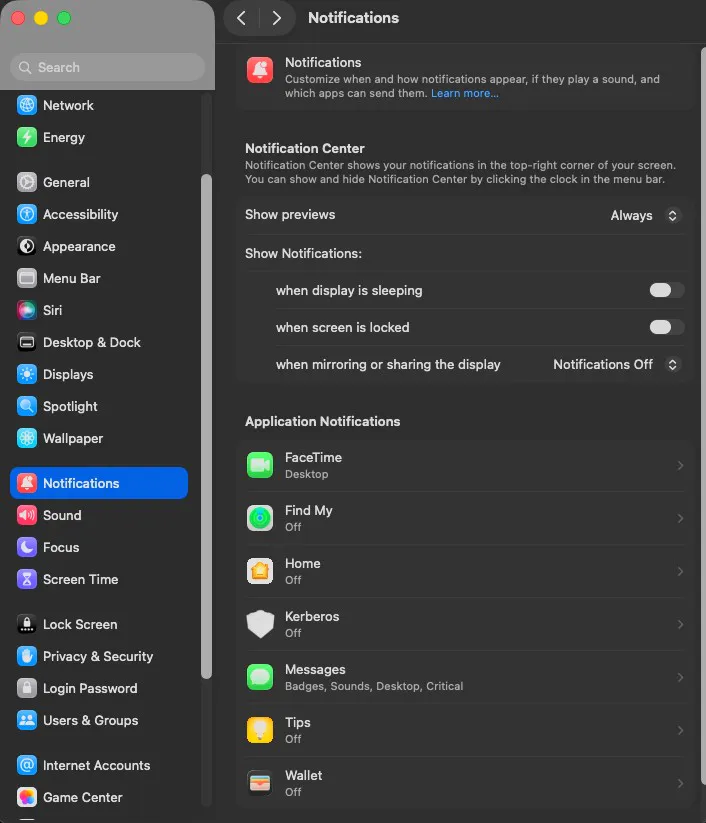
– Settings -> Notifications -> Anything you don’t need -> Off
– Settings -> General -> Sharing -> Anything you don’t need -> Off
– Settings -> General -> Login Items & Extensions -> Disable Anything you don’t need (maybe one of the most important, but as its a fresh install you won’t have much stuff here)
Settings -> General -> AirDrop & Handoff -> Off if you never use them
Settings -> General -> AirDrop & Handoff -> AirPlay Receiver -> Off if you never use it
Settings -> Menu Bar -> keep it minimal
And… for an official Mac, that’s it really. Apple really doesn’t want you fiddling around more than needed. Keep these settings tidy, and you’ll most likely have a good? Apple-styled fun. You can check out the next sections regarding recommended Apps. For Hackintoshes and VMs, we still gotta work, to make iCloud, iMessage function properly.
1.6) Extra stuff for VMs
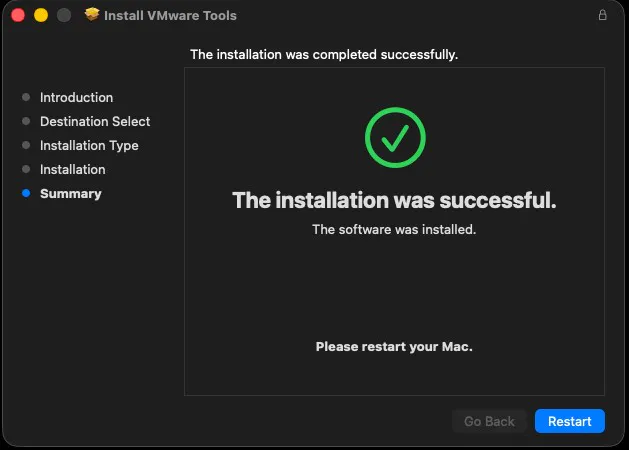
Install VMware Tools ASAP. Accept all privacy prompts whenever they appear and make sure it installs correctly. On my VM, it hanged the first time and I had to reinstall. Keep trying until you see “The installation was successful.” then reboot.
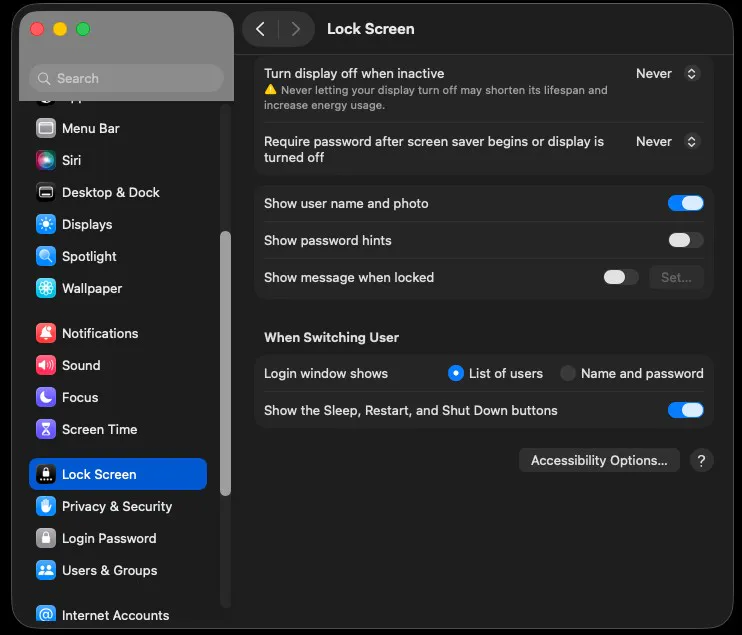
– Settings -> Lock Screen:
Turn display off when inactive -> Never
Require password after screen saver or display off -> Never
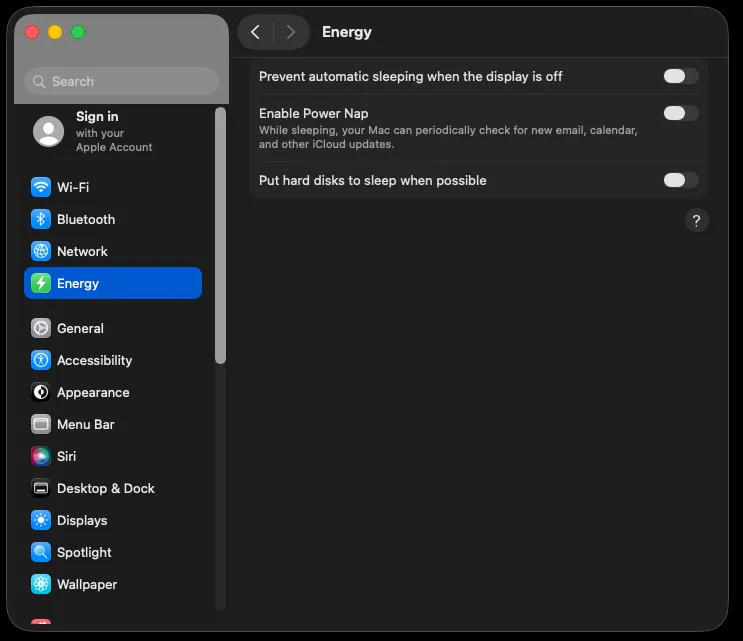
– Settings -> Energy:
Prevent automatic sleeping when the display is off -> Off
Enable Power Nap -> Off
Put hard disks to sleep when possible -> Off
– Settings -> Desktop & Dock: Automatically hide and show the Dock -> Off (for some reason, my Dock didn’t show, inside the VM, until i switched this off).
Here’s my hand-picked orbit of MacOS Tahoe apps for 2025 onwards – small, sharp utilities that do what Apple forgot. Each one complements a minimal workflow, filling gaps where macOS falls short without adding too much clutter. They’re here to refine, extend, and keep the system as lightweight as it was meant to be. None of the links are sponsored.

1. AdGuard for Safari Extension
“Cut the chatter, keep the web.” Native Safari blocker with proper filter muscle.
Download (free)🔗
2. AlDente
Set charge limits, protect MacBook life. Free core, Pro adds extras.
Download (free)🔗

3. Anydesk
Lightweight family support tool. Never accept surprise sessions from scammers.
Download (free)🔗

4. AppCleaner
Uninstall with crumbs included. Finds the leftovers Apple forgets.
Download (free)🔗
5. BetterDisplay
HiDPI, virtual displays, menubar control, custom resolutions. Great tool if you have a dual-monitor setup.
Download (free)🔗

6. BetterZip
Remember WinRAR and 7-zip? The only potent unarchiver for Mac with similar GUI. Quick Look plugin.
Download (free trial)🔗

7. BlockBlock
Hall monitor for persistence. Alerts when something tries to auto-start itself.
Download (free)🔗

8. coconutBattery
Know your cells. Live health stats for Mac, iPhone, iPad.
Download (free)🔗

9. Crossover
Windows apps, no Windows. Run many .exe apps without a VM.
Download (free trial)🔗

10. GrandPerspective
It ain’t Treesizefree but it’s ok. Treemap view to hunt big files fast.
Download (free)🔗

11. Karabiner-Elements
Keybinds on god mode. Per-key remaps, layers, complex rules.
Download (free)🔗

12. KnockKnock
Who’s living here rent-free? Lists persistent items so you can evict junk.
Download (free)🔗
13. LuLu (firewall)
Outbound calls screened. Blocks unknown connections by default.
Download (free)🔗

14. Nitefall Safari Extension
Make the whole web midnight. Safari extension for true-dark browsing.
Download (paid)🔗

15. OnyX
Maintenance, but civilized. Version-matched tuning, logs, and caches cleaning. Avoid other cleaners, in my opinion.
Download (free)🔗

16. PDFgear
PDFs without paywalls. Edit, annotate, OCR, merge – no watermarks.
Download (free)🔗

17. PearCleaner
The open-source uninstaller. AppCleaner-style with modern Swift UI.
Download (free)🔗

18. Remote Mouse
Couch mode engaged. Phone becomes a trackpad and keyboard. Secure it with a password.
Download (free)🔗

19. Scroll Reverser
Trackpad natural, mouse normal. Independent scroll directions per device.
Download (free)🔗

20. Stacher7 (yt-dlp GUI)
Save the stream, legally please. Front-end for yt-dlp; perfect for your own content and fair-use grabs.
Download (free)🔗

21. Super Agent (Safari)
Auto-nuke cookie popups. Set your preference once; it clicks for you.
Download (free)🔗
Cautions:
– AnyDesk: if someone cold-contacts you to install it, it’s a scam. Only share your session ID with people you trust. Use “Allow only when I accept” and never enable unattended access.
– BetterZip vs built-in: macOS can unzip ZIPs natively. BetterZip is for inspecting and handling rar/7z/tar/iso without extracting.
– Objective-See tools (BlockBlock, KnockKnock, LuLu) are lightweight and SIP-friendly.
Install only what you’ll actually use.
You’ll see that if you try to login on your Apple Account (preferably a secondary one), you’ll find that it doesn’t work. It usually shows the “Verification Failed – An unknown error occured.”

This happens because we don’t yet have a correct Serial Number, HW Number, Board ID ROM and MLB. When the VM/Hackintosh calls Apple, Apple verifies if these identifiers are unique and correct and decides whether it should allow the connection or not. However, this can be fixed, with some smart spoofing. Remember, this is for educational purposes only, as it breaks Apple’s ToS.
⚠️ Heads up:
– As Apple tightened VM identity support starting with macOS 15, your mileage may vary. If you installed an older MacOS, this iService method is proven to work. Hackintoshes might still work up to MacOS Tahoe.
– This little detour through virtual Cupertino might boot straight into iCloud paradise… or it might leave you staring at the login wall.
– That’s the game: some IDs slip through, some don’t – and Apple’s dice roll changes with time.
3.1) For Hackintoshes
Pretty easy to do, I won’t copy/paste Dortania’s guide.
Just follow it here🔗 and you will be ready in no-time.
3.2) For VMs
– Download Clover Configurator here🔗 and run it.
– Click Done on the Not Opened prompt.
– Go System Settings -> Privacy & Security -> Scroll Down -> Open Anyway on the “Clover Configurator” was blocked to protect your Mac prompt.
– When Clover Configurator appears, go to SMBIOS and click the little up/down arrow as seen in the picture.
– Choose MacPro 7,1 – Mac Pro (16 cores, 2019) | Intel Xeon W-3245M CPU @ 3.20 GHz, at the bottom.
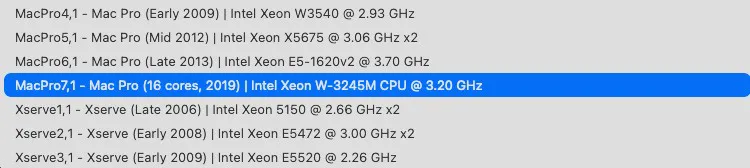
On the same screen, click on “Generate New” near Serial Number. Click it multiple times, mix things up a bit.
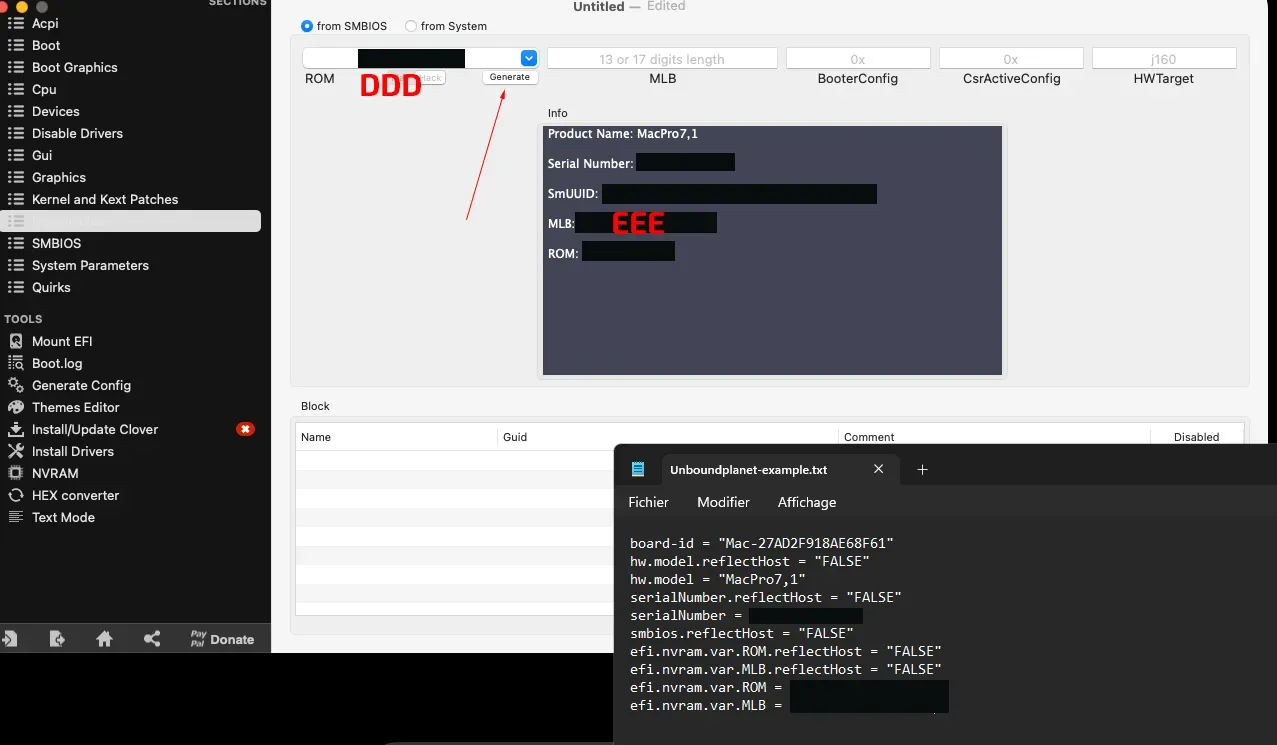
Back in Windows, create a .txt file. Paste the following:
board-id = "AAA"
hw.model.reflectHost = "FALSE"
hw.model = "BBB"
serialNumber.reflectHost = "FALSE"
serialNumber = "CCC"
smbios.reflectHost = "FALSE"
efi.nvram.var.ROM.reflectHost = "FALSE"
efi.nvram.var.MLB.reflectHost = "FALSE"
efi.nvram.var.ROM = "DDD"
efi.nvram.var.MLB = "EEE"
In Windows be on Notepad. On the Mac VM, be in Clover – SMBios (same window). Copy Board-ID inside “AAA”, MacPro7,1 inside “BBB”, serial number inside “CCC”, as seen in the picture below.

For “DDD” and “EEE”, click Rt Variables inside Clover Configurator, then click Generate.
Still inside Windows, go to your VM folder, and edit the .vmx file with Notepad.
1. Search board-id.reflectHost . If it’s “FALSE”, change it to “TRUE” (keep the “”).
2. Search for firmware . Hit Enter, and here you’ll copy all of the .txt file we made.
3. Search for ethernet0.addressType . If it’s “generated”, change it to “static”
4. Search ethernet0.generatedAddress . Here, delete “generated”, so it only remains ethernet0.Address. Still here, change only the first 6 characters of the value (: not included) to an Apple MAC address. You can find some in this link🔗. For example, I used 00-88-65:
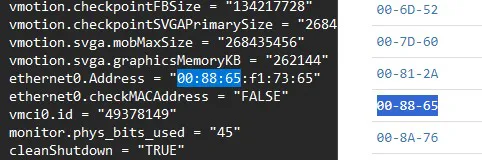
5. Finally, search for ethernet0.generatedAddressOffset . Delete the whole line and replace it with: ethernet0.checkMACAddress = “FALSE”
If you did everything correctly, all iServices should work properly. Try logging in. If it still gives the verification error, you missed something, or maybe Apple patched this (although I haven’t seen anything about this recently). Congratulations!
We’ve kept the surface clean and the controls in your hands – whether you installed macOS Tahoe (26) on a real Mac, spun it up in a VM, or locked in one last, well-tuned Intel Hackintosh. You now have a fresh, minimal macOS with sensible defaults, stock protections intact, and a repeatable process you can trust when it’s time to wipe and rebuild. We did as much as possible, without touching the SiP, which is just not worth the hassle.
On Nova, we favor fewer moving parts and fewer surprises. Thanks for reading and riding along, you’re awesome.
Of course, much more stuff is coming soon, so:
Stay tuned right here, on Unbound Planet, with your favorite host.
–Theo
Contact me🔗 for suggestions, feedback, ideas.